Working With Claim_Create a Write-off Adjustment
1. Sign on using the following information (User should be other then operations)
- User = 01USER
- Password = welcome
Responsibility = Receivables, Vision Operations (USA)
Enter Approval Limits
2. Navigate to the Approval Limits window
(N) Setup > Transactions > Approval Limits
3. Enter the following information:
| Field | Value |
| Username | 01user |
| Document Type | Adjustment |
| Currency | USD |
| From Amount | -25 |
| To Amount | 25 |
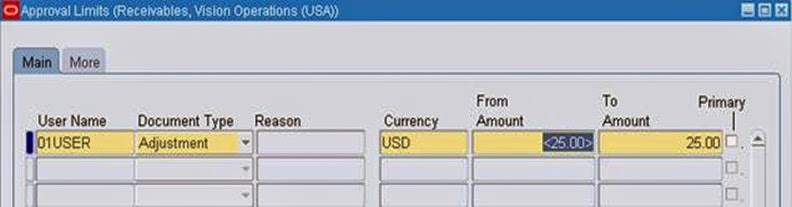
4. Click (I) Save.
Create the Write-Off Adjustment
5. Navigate to the Transactions Summary window
(N) Transactions > Transactions Summary
6. Navigate to (M) View > Find and enter the following information:
| Field | Value |
| Transaction Number | 500875 |
| Ship To Name | Advanced Network Devices |
7. Click (B) Find.


8. Click (B) Adjust and enter the following information:
| Field | Value |
| Activity Name | Write-Off |
| Type | Invoice |
| Amount | -100 |
9. Click OK (B)

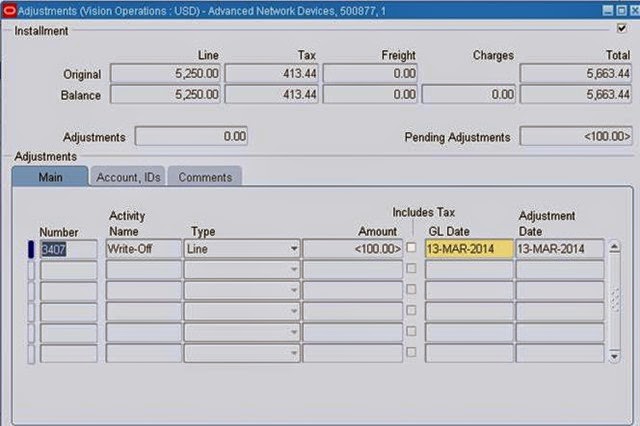
10. Click (I) Save
Note: The amount is outside of Preparer’s approval limit. Make a note of the following update:
- Pending Adjustments = -100
Note: Invoice type adjustments must make the balance 0. In addition, approval amounts are validated on a line-by-line basis.
Log in as a Different User and Approve the Pending Adjustment
11. Navigate to (M) File > Exit Oracle Applications
12. Click (B) OK.
13. Navigate to the Oracle Applications Home Page.
14. Click (L) Logout.
15. Log in as a New User using the following information:
- User Name = operations
- Password = welcome
16. Click (B) Login and select the following:
- Responsibility = Receivables, Vision Operations (USA)
17. Navigate to the Approve Adjustments window.
(N): ARàControlàAdjustmentàApprove Adjustment
18. Enter the following information:
- Creator = 01USER
- Status = Pending


18. Change Status from Waiting Approval to Approved.
- Status = Approved

19. Click (I) Save.
20. Click (B) Action History.
21. Note the Action History.

22. Close all the windows and return to the Navigator.
23. Follow the preceding steps from 10 to 14 to Exit Oracle Applications and sign in again using 01USER username.
Run the Adjustment Approval Report
24. Select the following responsibility:
Responsibility = Receivables, Vision Operations (USA)
25. Navigate to the Standard Request Submission window.
26. Click (B) OK to submit a single request with the following information:
- Name = Adjustment Approval Report
- Order By = Customer

27. Click (B) OK to accept defaults.
28. Click (B) Submit.
Note: Do not submit another request.
29. Navigate to (M) View > Requests
30. Click (B) Find.
31. Click (B) Refresh Data until the request completes

32. Click (B) View Output.

33. Close all windows and return to the Navigator.


