Showing posts with label Receivables. Show all posts

Tuesday, January 10, 2017

Oracle receivables Late charge report ended with "no data found"

Issue:

Oracle receivables Late charge report ended with "no data found"

Solution:

1. Go into the responsibility: Receivables.

2. Navigate to Customers -> Customer profiles

Query back the profile used on your customers

Click on the 'Late Charge Profile'

Check the 'Late Charge Type'

select 'Adjustment'


Ensure you update all customers when prompted.

If you have already done the above set up and still no invoices are picked up, please check the below.

Please select 'Charge Schedule Per Invoice' instead of 'Charge Schedule Per Tier'.In 'Charge Schedule Per Invoice' the 'Schedule Type' can be defined as 'Percentage' as well as 'Amount' Type.The set up for 'Charge schedule Per Invoice' is same as 'Charge Schedule per Tier' where we can define our own slabs.

Whereas In 'Charge Schedule Per Tier' the 'Schedule Type' can be defined only as 'Amount'.


Oracle receivables Late charge report ended with null output (not generating output)

Issue:

Late charge report not generating output

Solution:

Set the profile to Yes at the site level.

Profile Name: "AR: Use Statement, Dunning, and Late Charges"

Responsibility: System Administrator

Navigation: Profile > System

Query Profile : AR: Use Statement, Dunning, and Late Charges

Set the profile option to "Yes" at the site level.


Tuesday, January 19, 2016

How To Change GL Date or Receipt Date for a Receipt That Is Not Applied Or Posted to General Ledger

Once the receipt record is saved, the Receipt date and GL date can no longer be updated.

To change these dates, you would have to delete (or reverse) the receipt and re-create it with the correct dates.

Note: This is intended standard functionality

Wednesday, January 6, 2016

How to Change Payment Term For Invoices Which Are Posted Into GL

As per user guide, it is not allowed to change the Payment Term after a transaction has been posted.

Also, there is no API that allows update to existing transactions.

Note:  Setting profile option "AR: Update Due Date"  to 'Yes', allows you to change the Due Date of the invoice via the Account Details form

For further information please See section: Maintaining Transactions Field Reference

AR Payment term field mandatory Personalization..

We can use the below personalization to make the Payment Terms field as mandatory.

Please use the following steps in TEST before production:

Responsibility: Receivables, Vision Operations (USA)
Navigation: Transactions > Transactions
Go To: Help > Diagnostics > Custom Code > Personalize

1. Create a function with the following values:
Seq: 1
Description: Payment Term Name Mandatory
Level: Function

a. Under 'Condition' Tab
Trigger Event: WHEN-NEW-ITEM-INSTANCE
Trigger Object: TGW_HEADER.CT_REFERENCE_MIR
Condition: Processing Mode = Not in Enter Query Mode

b. Under 'Actions' Tab add the following sequences:
Seq: 1
Type: Property
Object Type: Item
Target Object: TGW_HEADER.RAT_TERM_NAME_MIR
Property Value: REQUIRED
Value: TRUE

2. Create another function with the following values:

Seq: 2
Description: Payment Term Name Mandatory 1
Level: Function

a. Under 'Condition' Tab
Trigger Event: WHEN-NEW-ITEM-INSTANCE
Trigger Object: TGW_HEADER.CTT_TYPE_NAME_MIR
Condition: Processing Mode = Not in Enter Query Mode

b. Under 'Actions' Tab add the following sequences:

Seq: 1
Type: Property
Object Type: Item
Target Object: TGW_HEADER.RAT_TERM_NAME_MIR
Property Value: REQUIRED
Value: TRUE


3. Save the changes.

4. Close all the forms.

5. Open Transactions > Transactions

6. Test the scenario.

7. Perform in other environments with business need.


Tuesday, November 24, 2015

Unable to Search Customer in Customers HTML Form after creating through Customer Interface

Customer successfully created through Customer Interface
Query the newly created customer in the Customer Masters screen, and system won't show this customer
Same Customer appears in the customer list in the Sales Order form in OM and the Transactions Form in AR
Not able to View/Find/Search the Customer from Customer Forms
There is no problem with Manually created Customers

So need to make sure those data are in staged table.
After importing the customers via customer interface you need to run the 'DQM Staging Program' to make it available in the Customer search .

Solution:

Please run DQM Staging program with STAGE_ALL_DATA parameter.
Once this program finishes successfully, Customer can be searched in Customers form.

Sunday, November 1, 2015

How to create supplier as a customer in R12


Customer has to create from supplier..
Step-1

Attach the profile option at site level.

AR: Show parties without Accounts in DQM


Step – 2
Create the supplier..


Step – 3
Note down the register number
Navigate to receivables responsibility and query the customer using registry number…and click GO


Step – 4
This will query the records from HZ_PARTIES tables, since supplier information will not have customer page such as Account number, description, Bill to and ship to sites.

We must create the customer account manually by click “Create Account” and add further information such as bill to and ship to etc…


Now supplier is also been a Customer ..


Wednesday, July 8, 2015

Auto Invoice Errors: Invalid salesrep number (SALESREP_NUMBER) ((Null)) ,Invalid sales credit type name (SALES_CREDIT_TYPE_NAME) ((Null))

Error:

Errors: 1)Invalid salesrep number (SALESREP_NUMBER) ((Null))
           2)Invalid sales credit type name (SALES_CREDIT_TYPE_NAME) ((Null))

Fix:


To correct data in the AutoInvoice Interface Table using the Interface Lines form:

a. Under AR Receivables responsibility, navigate to Control, Autoinvoice, Interface Lines Query
all lines in the interface tables getting reported validation error.

b. Press the Sales Credits button and verify the values for the
Salesrep Number and/or Sales Credit Type Name fields. Correct values for all rows.


Issue occurred while AGIS Intercompany Invoices, Follow the below process to correct those issues..

Issues description (Autoinvoice Import Program log output):


Errors:   1)Invalid salesrep number (SALESREP_NUMBER) ((Null))
          2)Invalid sales credit type name (SALES_CREDIT_TYPE_NAME) ((Null))


Solution:

1. Make sure that the allow sales credit check box is not checked:
1.1. Navigate to Receivables manager --> Setup --> Transactions-->Sources form.
1.2. Query source 'Global Intercompany'.
1.3. Uncheck allow sales credit check box.
1.4. Save.
1.5. Re-run autoinvoice.


2. If it continues to fail with this message please check if Require Salesperson is checked at
setup -> system -> system Options -> Miscellaneous Tab


3. The following errors can also occur if the autoinvoice batch source is setup incorrectly.
Errors:
A)Invalid salesrep id (SALESREP_ID) ((Null))
B) Invalid sales credit type id (SALES_CREDIT_TYPE_ID) ((Null))

3.1. If after applying Patch 7007819 these errors occur, then do the following :-
3.2. Log on as receivables
3.3 Navigate setup, transactions sources
3.4 For the operating unit you are using, query back the name Intercompany
3.5 Use the > arrow to access the Sales Credit Validation tab.
Under this tab, the Salesperson must be set to ID and the Sales Credit Type must be set to ID.
If value is checked then you must check ID.
3.6. Once ID is checked, then re-run autoinvoice for this batch and see if it is imported successfully.


Error Auto Invoice: arcsai() Not all AutoAccounting types are defined Error calling arcdsu_do_setup() Error calling raaini()

Error:
Error while running AR auto Invoice import program

arcsai() Not all AutoAccounting types are defined Error calling arcdsu_do_setup() Error calling raaini()

Fix:
Please setup the Auto Accounting for all the Accounting Types.

N: Receivables -> Setup -> Transactions -> AutoAccounting

The minimum mandatory types are below:

1.FREIGHT
2.REC
3.REV
4.SUSPENSE (AutoInvoice Clearing)
5.TAX
6.UNBILL (Unbilled Receivable)
7.UNEARN (Unearned Revenue)


Use below script to identify the missing auto accounting types;

SELECT GL_DEFAULT_ID,
TYPE FROM RA_ACCOUNT_DEFAULTS_ALL
WHERE ORG_ID = &orgid 
AND TYPE IN 
('FREIGHT', 'REC', 'REV', 'SUSPENSE', 'TAX', 'UNBILL', 'UNEARN');


Tuesday, June 23, 2015

Customer Interface Issue: Cannot Populate Account_Name In RA_CUSTOMER_PROFILES_INTERFACE

You cannot create Account Name using Customer Interface (RACUST) as this column does not exist in RA_CUSTOMER_PROFILES_INTERFACE.

Your alternative would be to use TCA API procedure to populate the Account Name:
Procedure: HZ_CUST_ACCOUNT_V2PUB.CREATE_CUST_ACCOUNT
Parameter Name = account_name


For More information:


Please refer the oracle support Notes:

1. Trading Community Architecture API User Notes
2. Note 189369.1 How To Create A Customer Via TCA API
3. Note 230753.1 Different uses of TCA API

Wednesday, June 17, 2015

How To delete or Purge Customers from Oracle Receivables

At this time there is no functionality available to purge/delete customer information from Oracle Receivables and hence Oracle support can not provide a script to delete the customers incorrectly loaded or the customer that will never be used. Customer information is stored in about 20 to 25 tables. It is not supported solution to delete the record from the database by any unsupported means.

How To Create a Customer That is Also a Supplier


Step to create customer as a supplier:

1. Enable the profile option at site level : POS:SM: Supplier Data Hub Configuration


2. Set this profile option to "Standalone" if you are implementing Supplier Hub as a Standalone MDM instance.


3. Steps below to reproduce the same:

a. Create Customer Party
b. Login to Supplier Data Librarian Super User responsibility
c. Click "Select" and click the "Enable As Supplier" button & Save
d. Search for the customer created.
e. Navigate to Payables --- Supplier page and see "Enable As Supplier" option available
f. The customer that was enabled as a supplier is now available for further action.


Sunday, April 19, 2015

FRM-40735: on-insert trigger raised unhandled exception ORA-01403

Issue:
FRM-40735: on-insert trigger raised unhandled exception ORA-01403

Form Path : /u01/install/APPS/fs1/EBSapps/appl/ar/12.0.0/forms/US/ARXTWMAI.fmx
Form Version : 12.0.149.12020000.17
Form Last Modified : $Date: 2014/04/02 23:09  $

Solutions:

Review the HR: Security Profile option to be sure it has been assigned at the Responsibility level
before the User is assigned to the Responsibility

Responsibility:  System Administrator 
Navigation:  Profile > System > Set HR Security Profile at responsibility level.

Also check the profile MO: Security Profile.  The two profiles must be same, otherwise the error will occur.

Sunday, January 11, 2015

How to create Employee as a customer in AR


Requirement:

How to create HR employee as a AR Customer, after completing this employee will be acted as a customer then have to use them in AR & OM.

Solution:

AR: Show Parties Without Accounts In DQM

Please set the Profile option at site level and query the Employee name in the customer screen with Person as a header selection.

image

Thursday, April 17, 2014

an error attempt has been made to enter a null value in to a column that require a data please correct to ensure that only valid values are entered for the column

Error:

an error attempt has been made to enter a null value in to a column that require a data please correct to ensure that only valid values are entered for the column


Solutions:

Please Validate the receipt class definition in bank account tab bank charge account is defined properly.

Responsibility:  Receivables
Navigation:  Setup > Receipts > Classes
1. Query Receipt Class used in Receipt creation
2. Check for the Payment Method
3.  Go to Bank Accounts > Account should be defined for bank charges

Friday, April 4, 2014

How to Void Transactions in Receivables

Overview:

Receivables lets you make a debit memo, credit memo, on-account credit, invoice, or chargeback invalid by updating the transaction type.

You can void a transaction only if the following are true:

· it does not have any activity against it

· it has not been processed by the Revenue Recognition program

· it has not been posted to your general ledger

1. Login oracle application Home page

Define a Transaction Type

2. Navigate to Transaction Type window

(N): Setup> Transaction > Transaction Type

3. Enter the following information

Field

Value

Name

Void

Class

Invoice

Transaction Status

Void

Creation Sign

Any sign

Printing Option

Print

Receivables Account

01-000-1210-0000-000

Revenue Account

01-420-4110-0000-000

Note:

Set Open Receivables to ‘No’

clip_image002

To void a transaction

4. Navigate to Transaction Summary window

(N): Transaction > Transaction Summary

5. Query the transaction which you want to ‘void’

6. Find by entering Transaction Number and ship to address

clip_image004

7. Click open (B)

clip_image006

8. Select the Transaction type as ‘Void’

9. Click yes in decision popup window

clip_image008

10. Select payment term

11. Click Save (B)

clip_image010

12. Click complete (B)

clip_image012

13. Close the form

14. Return to the main page

Monday, March 31, 2014

Receivables Write-off Adjustment

Working With Claim_Create a Write-off Adjustment

1. Sign on using the following information (User should be other then operations)

- User = 01USER

- Password = welcome

Responsibility = Receivables, Vision Operations (USA)

Enter Approval Limits

2. Navigate to the Approval Limits window

(N) Setup > Transactions > Approval Limits

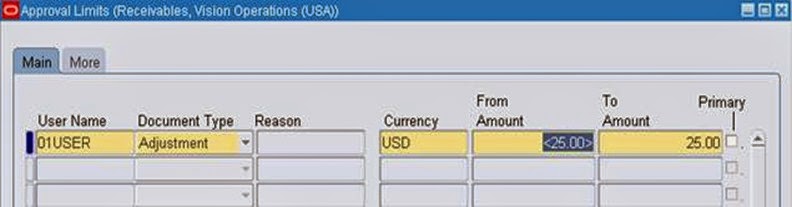
3. Enter the following information:

Field

Value

Username

01user

Document Type

Adjustment

Currency

USD

From Amount

-25

To Amount

25

clip_image002

4. Click (I) Save.

Create the Write-Off Adjustment

5. Navigate to the Transactions Summary window

(N) Transactions > Transactions Summary

6. Navigate to (M) View > Find and enter the following information:

Field

Value

Transaction Number

500875

Ship To Name

Advanced Network Devices

7. Click (B) Find.

clip_image004

clip_image006

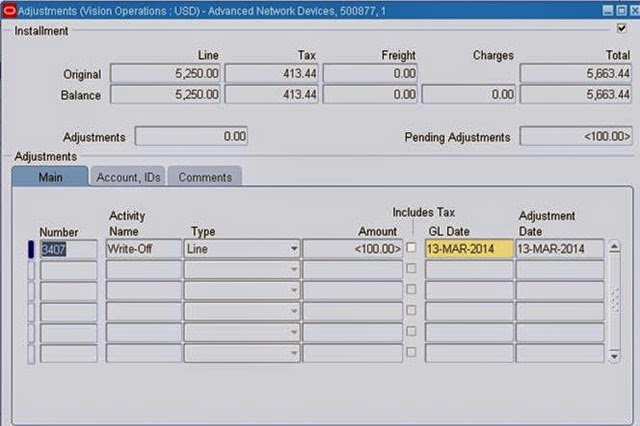
8. Click (B) Adjust and enter the following information:

Field

Value

Activity Name

Write-Off

Type

Invoice

Amount

-100

9. Click OK (B)

clip_image008

clip_image010

10. Click (I) Save

Note: The amount is outside of Preparer’s approval limit. Make a note of the following update:

- Pending Adjustments = -100

Note: Invoice type adjustments must make the balance 0. In addition, approval amounts are validated on a line-by-line basis.

Log in as a Different User and Approve the Pending Adjustment

11. Navigate to (M) File > Exit Oracle Applications

12. Click (B) OK.

13. Navigate to the Oracle Applications Home Page.

14. Click (L) Logout.

15. Log in as a New User using the following information:

- User Name = operations

- Password = welcome

16. Click (B) Login and select the following:

- Responsibility = Receivables, Vision Operations (USA)

17. Navigate to the Approve Adjustments window.

(N): ARàControlàAdjustmentàApprove Adjustment

18. Enter the following information:

- Creator = 01USER

- Status = Pending

clip_image012

clip_image014

18. Change Status from Waiting Approval to Approved.

- Status = Approved

clip_image016

19. Click (I) Save.

20. Click (B) Action History.

21. Note the Action History.

clip_image018

22. Close all the windows and return to the Navigator.

23. Follow the preceding steps from 10 to 14 to Exit Oracle Applications and sign in again using 01USER username.

Run the Adjustment Approval Report

24. Select the following responsibility:

Responsibility = Receivables, Vision Operations (USA)

25. Navigate to the Standard Request Submission window.

26. Click (B) OK to submit a single request with the following information:

- Name = Adjustment Approval Report

- Order By = Customer

clip_image020

27. Click (B) OK to accept defaults.

28. Click (B) Submit.

Note: Do not submit another request.

29. Navigate to (M) View > Requests

30. Click (B) Find.

31. Click (B) Refresh Data until the request completes

clip_image022

32. Click (B) View Output.

clip_image024

33. Close all windows and return to the Navigator.

Credit Memo against Invoice in r12 Receivables

Case study for AR Credit Memo against Invoice

1. Navigate to Transaction window

(N) Receivables > Transaction > Transaction

2. Enter the invoice mandatory fields

Field Name

Value

Sources

Manual

Class

Invoice

Type

Invoice

Ship to

Business World (real time customer name)

3. Click Lines (B)

clip_image002

4. We have to select line item, Quantity and price details

5. click on save (B)

clip_image004

7. Optionally we can also check the account details by clicking “distribution”

clip_image006

8. Click on “Complete” (B) to complete your transaction

clip_image008

9. Now we can see the completed check box has been checked.

clip_image012

10. We can also check the printed invoice by clicking print button

11. Check the outstanding balance In below screen

clip_image015

12. Create accounting by navigating tools > Create accounting field

13. Select your option of accounting and click OK

clip_image017

14. View accounting by navigating Tools > View Accounting

15. We can see the accounting entries created by the Transaction

clip_image019

Create credit memo for this invoice and make the balance NIL amount.

16. Navigate to the “Action” button and click “Credit” Button

clip_image021

17. Invoice number selected to raise the Credit memo

18. Ensure that Type is selected for “Credit Memo” else select it

clip_image023

19. Click on the “Credit Balance” button to raise fully credit

20. You will get the conformation message like below, click ok

clip_image025

21. Now we can see that credit amount fully applied to that invoice number 12024

22. Balance got “Zero”

23. Click save (B)

clip_image029

24. Click “Complete” (B)

25. Now credit memo applied and completed.

clip_image032

26. Do the Create the accounting in Tools > create accounting

27. Select how you want to create accounting and click ok like draft or final

28. click OK (B)

clip_image034

29. view accounting from Tools > View Accounting

30. In this screen the accounts get reversed

clip_image037

31. Query the Invoice using invoice number

clip_image039

32. Enter the invoice number and click find button

clip_image042

33. Click the “Details” Button to view the complete balance details

34. Check below screen the balance has been get cleared

clip_image046

35. we can also check in transaction print showing null balance in the end outstanding

clip_image049