Standard
Reports and Listings
Oracle General Ledger delivers over 70 standard reports.
The following categories provide financial and non-financial information for
General Ledger data.
Standard Reports and Listings
Oracle General Ledger provides several types of reports and
listings to meet your business needs. All of the information in these reports
and listings is also available online.
You can obtain account analysis information, budget
information, chart of accounts listing, and many other types of data without
customization.
When
to Use Standard Reports
Use Standard Reports to do the following:
• To
view financial and non-financial information in trial balances, journals,
account analysis, and other reports
• To
group reports into report sets that can be run simultaneously
• To
schedule reports to run at regularly scheduled intervals
Financial
Statement Generator Features
Financial Statement Generator (FSG) is a powerful report
building tool for Oracle General Ledger.
Financial Statement Generator Features
Oracle General Ledger's Financial Statement Generator
empowers you to do the following:
•
Generate financial reports, such as income
statements and balance sheets, based upon data in your general ledger.
•
Apply security rules to control what financial
information can be printed by specific users and responsibilities in any
reports they run using FSG.
•
Define your reports with reusable report
objects, making it easy to create new reports from the components of reports
you've already defined.
•
Design custom financial reports to meet specific
business needs.
•
Print as many reports as you need,
simultaneously.
•
Print the same report for multiple companies,
cost centers, departments, or any other segment of your account structure, in
the same report request.
•
Schedule reports to run automatically.
•
Produce ad hoc reports whenever you need them.
Print reports to tab–delimited files for easy import into
client–based spreadsheet programs.
Use Financial Statement Generator Reports to do the
following:
• Create
custom financial statements
• Create
consolidated reports and perform consolidation for companies sharing the same
set of books
• Report
on translated and foreign currency amounts
• Report
on budget vs. actual and different amount types such as PTD, QTD, and YTD
Preparing
Your FSG Report
Plan your report before you begin building your rows and
columns.
Preparing Your FSG Report
Before you define a report in Oracle General Ledger, draft
your report on paper. Sketching the report in advance helps you plan the format
and content of the report and saves you time later.
With FSG you use a fundamental row and column concept to
build your own financial reports:
• Decide
which rows and columns make up your report
• Define
the rows and columns
• Assign
attributes to the rows and columns
• Build
a report using the rows and columns
Building Basic Reports
Basic reports consist of a few headings to describe the
information in the report, followed by the report data, which is often
presented in tabular form as a series of intersecting rows and columns. Basic
reports are two dimensional, similar to what you might create in a spreadsheet.
Oracle General Ledger's Financial Statement Generator
(FSG) is a powerful and flexible report building tool you can use to build your
own custom financial reports without programming.
Financial Statement Generator
You can define custom financial reports, such as income
statements and balance sheets, online with complete control over the rows,
columns, and content of your report. You can control headings, descriptions,
format, and calculations in addition to the actual content. The reusable report
components make building reports quick and easy. You can copy a report
component from one report, make minor edits, then apply the report component to
a new report without having to create a new report from scratch.
Row Set
•
A required report component that defines the
rows of your report. Typically, accounts are assigned to row set definitions.
For each row, you control the format and content, including line descriptions,
indentations, spacing, page breaks, calculations, units of measure, and
precision.
Column Set
•
The second required report component that
defines the columns of your report. Typically, amount types are assigned to
column set definitions. You control the format and content of each column.
Report
•
You build a report by defining then combining up
to five reusable report components. At a minimum, you must have a row set and
column set for every report. Before you define a report using the Financial
Statement Generator (FSG), draft your report on paper. Sketching the report in
advance helps you plan the format and content of the report and saves you time
later.
Steps
for FSG Financial Reports
Use a four-step process to create and run customized
financial reports.
Steps for FSG Financial Reports
All reports require a row set and a column set. There are
three other optional report components that are used to apply special
formatting to your reports. For example, you can hide specific rows, rearrange
the sort order of your rows, display the account value and/or description, or
print reports by any accounting flexfield segment, such as department, on
separate pages.
Report Sets
•
A report set is a group of FSG reports.
Typically, report sets are used to group reports you run together frequently.
For example, you can create a month-end report set that includes a balance
sheet, an income statement by department, an income statement by company, and a
budget vs. actual income statement in a single submission without having to run
each report separately.
Defining
Row Sets
Define the format and content of rows in financial
reports.
Defining Row Sets
•
A single row set can be used for many different
reports. For example, Row Set A above is used for an Income Statement with
current information. It can also be used to produce an Income Statement for any
other entity (company, division, group, or cost center), or for the same entity
with a yearly comparison column.
•
A Row Set defines the format and content of the
rows in an FSG report. In FSG, the commonly assumed attribute for a row
definition is an account assignment, whereas the attribute for a column
definition is a time period or amount type. When you define a row set, you can:
Assign accounts:
•
To indicate which general ledger account
balances you want to include in the row. You can assign an individual account,
parent account, or range of accounts to each row.
Define calculations:
•
To perform a variety of complex computations in
your report. The calculations can refer to any previous rows in a report,
including rows you choose not to display.
Specify formatting:
•
To control page breaks, indentation, line
spacing, and underline characters. You can define a new row set, or use FSG's
AutoCopy feature to copy an existing row set, which you can then modify as
needed.
Note: If you have average balance processing enabled in your
set of books, you can report on functional, foreign, and translated average
balances.
Implementation Note
Row Set:
•
When creating a balance sheet, you must include
your entire income statement account range for the Current Period Retained
Earnings amount. Oracle General Ledger never posts the monthly net income
amount to an actual current period retained earnings account. This only happens
when the first period of a new fiscal year is opened. Thus, to achieve the
figure for current period retained earnings, it is a reporting solution where
you enter your Profit and Loss account range in the account assignment.
•
When creating reports, it is a good idea to
include check figures at the end of the report to verify that all accounts were
properly assigned in the reports. This is particularly useful if you have had
to enter account ranges with gaps because of the structure of your chart of
accounts.
•
For example, when creating a Balance Sheet, add
check figures at the end of the report defined as follows:
-
Total Assets 1000-1999
-
Total Liabilities 2000-2999
-
Total Stockholder's Equity 3000-9999. Note: In
order to derive the net income amount that is usually posted to current period retained
earnings, you must include your income statement account range.
Assigning Line Numbers to Rows:
•
You should enter line numbers in increments of
10 to allow for space to add additional rows for future modifications.
Account Assignment Display Option:
•
Oracle General Ledger stores debit balances as
positive numbers and credit balances as negative numbers. If you want your
credit balance accounts, such as liabilities, and revenues to display as
positive numbers, select the Change Sign check box. Doing so will have no
effect on your calculations.
Assigning
Accounts
You can select the sign and ranges of accounts for each
row in your row set.
Assigning Accounts
Select the Account Assignments button to assign accounts for
a row set.
Select a numeric operator (+ or -) to add or subtract the
totals for the account range.
Enter a Low and High for the range of account combinations.
To specify an individual account, enter the same account as the Low and High.
You can leave these fields blank to create generic row sets with universal
account assignments.
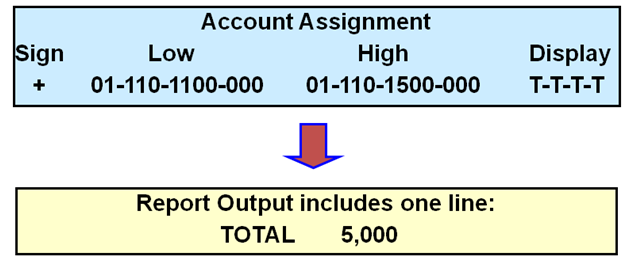
Enter a Display type for each account segment:
•
Select "E" to expand the range and
display one report line for each segment value.
•
Select "T" to total the amounts in the
range and display only one total line for the segment values.
•
Select "T" for each segment of the
range if multiple account ranges are assigned to a row.
•
Select "B" to display both the
expanded detail and the Total. "B" combines the effects of
"E" and "T".
Implementation Note
Account Assignment:
•
You should always enter a unique Row Name for
every row. The Row Name does not appear in any reports, but it does appear in
lists of values when you perform calculations. If the row is simply a label,
for example, "Current Assets", that does not have any accounts
assigned to it, you should append the row name with the word "label"
to let you know that this row contains no accounts and you will not need to
include it in your calculations. Also be sure the row name is unique to ensure that
calculations yield the correct results. If you use the same row name for two
different rows, FSG will not know which row to use.
•
Consider creating generic row sets by applying
"T" display types for each account segment. You can later define
content sets to create more specific reports.
Defining
Calculations in Row Sets
To define formulas, Oracle General Ledger provides the
following mathematical operators:
Defining Calculation in Row Sets
Median - The midpoint or the middle value.
Average - The value obtained by dividing the sum total by
the number.
Standard Deviation - A value obtained by dividing by one
less than the number of squares in the sum of squares.
Absolute Value - Debit and credit values are both displayed
as positive numbers.
Note: Because Balance Control and Display Options are
usually defined for columns, they are covered in the Defining Column Sets
section. However, they may also be defined for rows.
Implementation Note
Row Set Calculations:
•
Oracle General Ledger stores credit balances as
negative numbers and debit balances as positive numbers. For example, revenue
accounts are stored as negative numbers and expense accounts are stored as
positive numbers. Therefore, you should define your calculations accordingly.
For example, to create a row called Gross Margin that calculates revenues minus
costs, you should add (not subtract) your costs row to your revenue row.
Reviewing
Your Row Set Definitions
Review row set component definitions using standard FSG
listings requested from the Submit Request window.
• Use
the FSG–Row Set Summary Listing to review the name and description of the row
sets defined and the report title and the chart of accounts associated with
each row set
• Use
the FSG–Row Set Detail Listing to review the row sequence, name, description,
amount type, period offset, currency, format and display options, account
assignment and calculations for each row of a row set
Reviewing Your Row Set Definitions
The main difference between these two reports is that the
FSG–Row Set Summary Listing summarizes all row sets while the FSG–Row Set
Detail Listing details only one row set.
Defining
Ad Hoc Reports
Create financial reports on the fly by defining ad hoc
reports in the Run Financial Reports window.
Defining Ad Hoc Reports
To run ad hoc reports, you select report objects and other
report parameters during the report submission process. With predefined report,
you can run the report with the parameters you saved in the report definition
or you can change the parameters at runtime.
Note: If you change the parameters at runtime, FSG will not
save them in the stored report definition.
Defining
Column Sets
Define the format and content of columns in financial
reports.
Defining Column Sets
•
Column sets define the format and content of
columns in your financial reports. Column sets include headings and
subheadings, currency assignments, amount types, exception conditions, and
calculation columns for totals.
•
You can define columns one by one as you do for
row sets, or you can build a column set graphically.
•
When you define a column set, you indicate which
Oracle General Ledger balance type you want to include in the column.
•
Although you normally assign accounts to your
rows, you can also assign an individual account combination or range of account
combinations to each column.
•
You can define calculations to perform a variety
of complex computations in your report.
•
The calculations can reference other columns in
the report.
•
You can define a new column set, copy
information from an existing column set, or use one of the standard column sets
provided by Oracle General Ledger.
Implementation Note
Column Sets:
•
When using the Quarter-To-Date (QTD) Amount Type
in column sets to perform quarterly reporting, you will need to create four
different column sets if you are using a non-standard calendar, such as a 13
period calendar because 13 does not divide evenly into 4 and the period offsets
will not give the desired results.
Column Set Amount Types:
•
When creating column sets that will be coupled
with Balance Sheet Row Sets, be sure to use the Year-to-Date (YTD) amount type.
Oracle General Ledger does not store YTD balances. Thus, in order to achieve a
cumulative total on balance sheet accounts, you must have FSG calculate the
amount for you using the YTD amount type.
Applying
Column Set Relative Headings
You can use relative headings to create dynamic column
headings which depend on the period you specify. Relative heading you can use
are:
• &POI
(Period of Interest)
• &BUDGET
• &DOI
• &ENCUMBRANCE
• &CURRENCY
Applying Column Set Relative Headings
&POI:
•
Enter &POI, followed by a number from -999
to +999 that refers to the relative period offset of your column.
•
For example, enter &POI0 to display amounts
for the period you specify at run time, enter &POI-1 to display amounts one
period before the period you specify at run time.
&BUDGET:
•
Enter &BUDGET, followed by a control value
number to print the budget name assigned to the control value number when you
define or run your report.
&DOI:
•
Date of interest, the date for which you want to
run the report.
&ENCUMBRANCE:
•
Enter &ENCUMBRANCE, followed by a control
value number to print the encumbrance type assigned to the control value number
when you define your report.
&CURRENCY:
•
Enter &CURRENCY, followed by a control value
number to print the currency assigned to the control value number when you
define or run your report column.
Standard
Column Sets
Oracle provides 14 standard column sets that cover a
variety of generic reporting requirements.
• Income
Statements
• Balance
Sheets
•
Other Reports
Standard Column Sets
•
Columns containing actual amounts for multiple
consecutive periods (trend reports)
•
Actual, budget, and variance columns (control
reports)
The generic column sets can be used for the following
reports:
Income Statements
•
Functional: Breaks out expenses by functional
area
•
Natural Account: Lists expenses by account or
groups of related accounts
Balance Sheets
•
Detail balance sheet accounts
•
Summary balance sheet accounts
Other Reports
•
Statement of changes to financial position
•
Daily activity reports
You can define these reports at whatever level of detail is
appropriate for your business.
Reviewing
Your Column Set Definitions
Review column set component definitions using standard
FSG listings requested from the Submit Request window.
• Use the FSG–Column Set Summary Listing to
review the name and description of the column sets defined in your current set
of books
• Use the FSG–Column Set Detail Listing to
review the column sequence, name, description, amount type, period offset,
currency, format and display options, account assignment and calculations for
each column of a column set
Row
Set and Column Overrides
A conflict exists if different values are entered for the
same option in both the row set and the column set.
Row Set and Column Overrides
Row Overrides Column
•
Amount Type
•
Period Offset
•
Control Value (Must assign same currency or
budget type at row and column level)
•
Format Mask
•
Factor
•
Display Zero
•
Level of Detail
Column Overrides Row
•
Override Row/Column Calculations (Conflict
exists only if the same value (Yes or No) is entered at both the row and the
column set levels)
•
Activity
Other Conflicts
•
Accounts: Report uses intersecting accounts.
•
Summary: Must assign the same summary option at
the row and column level.
•
Currency: Must assign the same currency at the
row and column level.
•
Change Sign: Yes overrides No.
Change Sign on Variance: Yes overrides No.
Defining
and Requesting Financial Reports
Mix and match row sets and column sets to create a
variety of reports.
Defining and Requesting Financial Reports
•
Once you define a report, you can save it and
use it whenever you run a financial report or define a report set.
•
You can copy a financial report you have already
defined and modify the new report as necessary.
•
You can also define ad hoc financial reports as
necessary to meet special reporting needs.
Caution: If the same Row Set is used in ten different
reports and you later modify the Row Set, the ten reports will be affected.
Implementation Note
Ad Hoc Reports:
•
All ad hoc reports are saved by FSG to be rerun
in the future. You can delete each report individually in the Define Financial
Report window or you can delete all of them at once by running the Program –
Delete Ad Hoc Reports from the Submit Requests window.
Running Reports:
•
If your FSG reports are not producing output or
you are having trouble getting a complicated report definition to work
correctly, you should view the log file for the Financial Statement Generator
in the Requests window. If the error message in the log file is not detailed
enough, change the user profile option FSG: Message Detail to full.
Handling
Rounding Problems
Oracle General Ledger offers two choices for handling
rounding problems.
Example: Format is 99999; Factor is Thousands
Specifying
Control Values
Specifying Control Values
You can report on budgets, encumbrance types, and other
currencies by using control values. Control values are numbers that you specify
in the Control Value field, of the Balance Control options region, on row sets
and column sets. When you define a financial report applying the row set or
column set containing a control value, you must specify what the control value
or number represents in the Define Financial Report window. There is a Control
Value button located on the Define Financial Report window which opens the
Control Values window. Here, you specify a number and a budget name,
encumbrance type, and/or currency. For currencies, you can specify
"entered" currencies or "translated" currencies.
Note: You must run translation before you use the
"translated" currency type.
For example, if you define a column set and specify a
control value of "1", you refer to the same number in the report
definition and assign either a budget name, encumbrance type, or currency to
associate with the control value.
Notes:
•
You must assign the same budget, encumbrance
type, or currency to intersecting row and column control values.
•
You cannot enter currencies in the report definition
if the report does not contain a row and/or column set with a currency control
value.
•
You must specify a budget or encumbrance when
your report includes rows or columns which use related amount types, such as
PTD-Budget or PTD-Encumbrance.
Defining
Content Sets
Define content sets to override segment values and
produce multiple versions of a single report.
Defining Content Sets
Even though content sets are optional, they are the most
powerful component of all FSG components.
By assigning a content set to a report request, you can
generate hundreds of similar reports in a single run. The content set controls
how the numerous reports differ from each other. For example, you can define a
departmental content set which prints a separate report for each department or
you can apply a content set to an expand row set to print a total report.
Content sets work by overriding the row set definition of an
existing report and replacing the row set account assignments and/or display
options.
Content sets can be saved as part of a report definition, or
can be added dynamically at the time you request an FSG report.
Hint: Consider using content sets exclusively to control the
specific output for each report.
Selecting
Display Options
Use display options to control if segment range values
are totaled and how they are displayed.
• RE
- Row/Expand
• RT
- Row/Total
• RB
- Row/Both
• CT
- Column/Total
• PE
– Page Expand Report
• PT
- Report/Total
• N
- No Override
Selecting Display Options
You can enter a display option for each account segment
range to designate how you want to display information in a report and whether
to print single or multiple reports.
RE - Row/Expand:
•
Select RE to expand the range and display a
separate line for each segment value in the range. If you are using parent
values, enter the same value as the high and low. Oracle General Ledger
displays only the children (or grandchildren). This is the same as selecting
Expand for row sets.
RT - Row/Total:
•
Select RT to total the amounts in the range and
display only one line as the Total line. This is the same as selecting Total
for row sets.
RB - Row/Both:
•
Select RB to expand and total the range. RB will
display a separate line for each segment value and display a total for all the
segment values. This is the same as selecting Both when defining row sets.
CT - Column/Total:
•
Select CT to total the range and display only
the total for the segment values. This has no effect on the report display.
PE – Page Expand Report:
•
Select PE to expand the range and create a
separate report for each segment value in the range. If you are using parent
values, enter the same value as the high and low. Oracle General Ledger
displays only the children (or grandchildren).
PT - Report/Total:
•
Select PT to total the segment value range and
display the total on one page.
•
N - No override: Select to use display options
entered in the row set definition.
Implementation Note
Display Options:
•
Page Expand (PE) Report is the most commonly
used display option. It allows you to perform consolidation within FSG.
Reviewing
Your Content Set Definitions
Review report component definitions using standard FSG
listings.
• Use
the FSG Content Set Summary Listing to review the names, descriptions, and
processing types of the content sets defined in your current set of books
• Use
the FSG Content Set Detail Listing to review the segment values and their
display types for a content set
Defining
Row Orders
Modify the order of detail rows in a report.
Defining Row Orders
You can use a row order with row expand row sets or content
sets to control how expanded detail rows are displayed in your report.
You can do the following:
•
Display account descriptions in addition to or
instead of segment values.
•
Sort detail rows by amounts displayed in a
column.
•
Sort detail rows by account segment values or
segment value descriptions.
•
Rearrange the sequence of your account segments
to fit specific reporting needs.
•
Suppress descriptions for particular account
segments.
Ranking
Methods
Determine in what order rows are displayed:
• By
segment value
• By
segment description
• By
values within a specified column
• Specify
what segment information to display:
• Value
• Description
• Both
Ranking Methods
Oracle General Ledger offers several ways to order and
display expanded detail rows. Select a ranking method and to display segment
values, segment value descriptions, or both. Alternatives include the
following:
•
Order by ranking, display description: For
example, department number.
•
Order by ranking, display both: For example, the
name of the department.
•
Order by description, display description: For
example, department description.
•
Order by description, display value
•
Order by value, display description
•
Order by value, display value
Reviewing
Your Row Order Detail Listing Report
You can use the Row Order Detail Listing to review the
ranking and display options of a row order.
Copying
Reports and Components
Create new reports and report objects by copying existing
objects using AutoCopy, then modifying the copied report objects. Items that
can be AutoCopied include:
Copyright Reports and Components
You can copy existing row sets, column sets, content sets,
row orders, display sets, reports, and report sets to create new report
objects.
After you copy a report object, you can modify the new
object instead of recreating a new object from scratch.
Caution: Modifying a report object will affect all reports
that use the report object. To avoid affecting all reports that use a report
object you want to modify, use AutoCopy to create a copy of the report object,
then apply the desired modifications to the copy of the report object.
FSG
Report Prerequisites
Prerequisite for running Financial Statement Generator
reports include the following:
• Use
the profile option FSG:Allow Portrait Print Style to control print orientation
• Define
security rules to limit the financial information a specific user can print
• Include
Program - Run Financial Statement Generator in your responsibility to run FSG
reports as standard report submissions
FSG Report Prerequisites
•
To control the print orientation of reports that
are less than or equal to 80 characters wide, set the user profile option
FSG:Allow Portrait Print Style.
•
To limit what financial information can be
printed by specific users on their FSG reports, define security rules and
enable them for use with FSG.
•
To run reports through standard request
submission, your System Administrator must assign Program - Run Financial
Statement Generator to the report security group for your responsibility.
Note: We recommend that you run the General Ledger Optimizer
program before you run your monthly reports. This will help your financial
reporting processes run faster. Program – Optimizer is run from the standard
report submission window.
Enabling
FSG Security
Use the General Ledger Super User or System Administrator
responsibility to define security rules to control what financial information
specific users can print when they run FSG reports.
Enabling FSG Security
If you have General Ledger Super User or System
Administrator responsibility, you can define security rules to control what
financial information specific users can print when they run FSG reports. For
example, you can prevent Company 01 users from printing reports for Company 02
and vice versa.
Run
FSG Reports from Standard Request Submission
Run FSG Reports from Standard Request Submission
You can request reports from the Run Financial Reports
window or through standard request submission (Submit Requests window). The
advantage of requesting reports through standard request submission is that you
can schedule the reports to run automatically. You can also combine FSG reports
with standard reports, listings, and programs. The disadvantage is that you
cannot run report sets through standard request submission.
Running
Financial Report Sets
• You
can include multiple reports in a single financial report set
• You
can include multiple financial report sets in a single multiple report set
• You
can run all or part of a report set
• You
can run several reports with predefined print options and parameter values
• You
can include a report more than once if you want to run the same report with
different parameter values
FSG
Tips and Techniques
To maximize your reporting flexibility and keep report
maintenance to a minimum:
• Draft
your reports on paper first
• Define
a logical chart of accounts and make use of Parent accounts
• Define
generic row sets and use existing column sets
• Use
the Expand and Both options
FSG
Tips and Techniques
To maximize your reporting flexibility and keep report
maintenance to a minimum:
• Select
the rounding option for your calculations
• Change
the order of detail rows
• Use
content sets and display sets for your report
• Use
AutoCopy
• Transfer
report objects from one database to another
Setting
FSG Options for General Ledger
Setting FSG Options for General Ledger
FSG: Accounting Flexfield:
•
Select the General Ledger application reporting
flexfield. The default value for this profile option is account. You cannot
view this profile option at the user level. Your System Administrator must set
this profile option at the site or application level.
FSG: Allow Portrait Print Style:
•
Control the print orientation of your Financial
Statement Generator reports that are less than or equal to 80 characters wide.
You can print these reports in either portrait style (80 character wide) or
landscape style (132 character wide).
FSG: Enable Search Optimization:
•
Enhance the performance of reports that contain
account assignments with a large number of parent segment values and child
segment value ranges. When you set this profile option to Yes, the FSG
performance enhancement is applied.
FSG: Enforce Segment Value Security:
•
Control whether your defined security rules will
apply to reports produced using FSG.
FSG: Expand Parent Value:
•
Control whether the rollup group or the summary
flag associated with flexfield assignments determine the expansion of parent
values when requesting summary balances.
FSG: Message Detail:
•
Specify the error message catalogue and level of
detail in your error message log file when you request your Financial Statement
Generator reports.
FSG: String Comparison Mode:
•
Do not change this profile option unless
instructed to do so by Oracle World Wide Support. This profile option affects
the character language for text-based character sets.