Tuesday, December 30, 2014

The descriptive flexfield with application name iAssets (IA) and name IA Request Headers (IA_REQUEST_HEADERS) is not frozen. Please contact your system administrator.


Error:

The descriptive flexfield with application name iAssets (IA) and name IA Request Headers (IA_REQUEST_HEADERS) is not frozen. Please contact your system administrator.

Fix;

1) Navigate in regular Fixed Assets:
Setup > Financials > Flexfields > Descriptive > Segments

2) Query on:
Application = iAssets
Title = IA Request Headers

2) Click the "Freeze Flexfield Definition" checkbox and then hit the "Compile" button.

Additional note if the Flexfield View Generator is not spawning and it is required (in that this DFF may actually be used at some point) reference:

Unable to Compile a Descriptive Flexfield (DFF) : Flexfield View Generator Program is Not Spawned (Doc ID 1562495.1)

3) Next stop/start the webserver.

4) Once that is complete retest in iAssets again.

Thursday, December 11, 2014

You Cannot Expense An Adjustment To An Asset For Which You Have Already Amortized An Adjustment


Issue:

You Cannot Expense An Adjustment To An Asset For Which You Have Already Amortized An Adjustment


Fix:


Since an asset in the reclass group was already amortized, Amortize Adjustments would have to be checked in order for it to work.


An amortized adjustment was already performed for an asset that was being Mass Reclassed with "inherit depreciation rules of new category item" being selected, but not Amortize Adjustments.


Submit Mass Reclass with both or neither inherit depreciation rules of new category and the amortize adjustments box being checked (note this will amortized all reclassed assets in the mass transaction)

If there is going to be an adjustment for the group that includes an asset that already has an amortized djustment, then it must be amortized.

-OR-

If you do not wish to amortize all asset in the mass transaction then:

1. Manually reclass the amortized/erring asset

2.  Then retry the Mass Reclass (as it'll no longer include the issue asset)

Wednesday, December 10, 2014

The Reconciled and Reconciled but Unaccounted Status Mean For Payments

Account for Payment When Payment Clears Payables option is enabled.

Created invoice and accounted.
Created payment and accounted (status of payment is Negotiable).
Cleared payment - Status on payments form is Cleared but Unaccounted.
Accounted - status went to Cleared.
Reconciled - status went to Reconciled.


Cleared:- The bank has disbursed funds for the payment, and the payment has been cleared, but not matched to a bank statement within Oracle Cash Management. Payables uses this status when the Account for Payment When Payment Clears Payables option
is enabled.

Cleared But Unaccounted:- The bank has disbursed funds for the payment and the payment has been cleared but not matched to a bank statement within Oracle Cash Management. Payables uses this status when the Account for Payment When Payment Clears Payables option is disabled.

Reconciled:- The bank has disbursed funds for the payment, and the payment has been reconciled and matched to a bank statement in Oracle Cash Management. Payables uses this status when the Account for Payment When Payment Clears Payables option is enabled.

Reconciled But Unaccounted:- The bank has disbursed funds for the payment, and the payment has been reconciled and matched to a bank statement in Oracle Cash Management. Payables uses this status when the Account for Payment When Payment Clears Payables option is disabled.

Tuesday, December 9, 2014

Create Accounting for a Payment generates errors 95333 and 95359


Error:

95333: A conversion rate does not exist to convert USD to AUD for the conversion type Corporate
and conversion date 20-MAR-09 for line -25. Please use the Daily Rates form in General Ledger to
enter a conversion rate for these currencies, conversion date and conversion type.


95359: There is no accounted amount for the subledger journal entry line. Please inform your
system administrator or support representative that: The source assigned to the accounting
attribute Accounted Amount has no value for extract line number 88547. Please make sure the source
assigned to the accounting attribute Accounted Amount has a valid value, or assign a different
source to this accounting attribute.

Solution:

1. Specify a conversion rate for the currencies and conversion date mentioned in the error message 95333

Navigation under the General Ledger responsibility: Setup > Currencies > Currency Rates Manager > Daily Rates > click on the Create Daily Rates button Enter the From Currency, To Currency, Rate Type, Start Date, End Date and Rate, then click Apply


2. Run the AutoRate concurrent program in Payables

Go to the Submit Request window in Payable and submit the AutoRate concurrent process

3.Re-run the Create Accounting process for the transactions that received errors 95333 and 95359

Monday, November 10, 2014

Oracle financials interface tables

General Ledger Interface Tables:-
-----------------------------------------

GL_BUDGET_INTERFACE
GL_DAILY_RATES_INTERFACE

GL_DRM_HIERARCHY_INTERFACE
GL_DRM_SEGVALUES_INTERFACE

GL_IMP_COA_ERR_INTERFACE

GL_IMP_COA_NORM_HIER_INTERFACE

 GL_IMP_COA_SEG_VAL_INTERFACE

GL_IEA_INTERFACE
GL_INTERFACE
GL_INTERFACE_CONTROL
GL_INTERFACE_HISTORY

GL_REPORT_INTERFACE

GL_XFR_INTERFACE


Payables Interface Tables:-
---------------------------------

AP_INTERFACE_CONTROLS
AP_INTERFACE_REJECTIONS
AP_INVOICE_INTERFACE
AP_INVOICE_LINES_INTERFACE

OIE_POL_RATES_INTERFACE


Receivables Interface Tables:-
------------------------------------


AR_PAYMENTS_INTERFACE_ALL
AR_TAX_INTERFACE
HZ_PARTY_INTERFACE
HZ_PARTY_INTERFACE_ERRORS
RA_CUSTOMERS_INTERFACE_ALL
RE_INTERFACE_DISTRIBUTION_ALL
RA_INTERFACE_ERRORS_ALL
RA_INTERFACE_LINES_ALL
RA_INTERFACE_SALESCREDITS_ALL

AR_INTERFACE_CONTS_ALL

AR_PMTS_INTERFACE_HEADER_GT

AR_PMTS_INTERFACE_LINES_GT

AR_PMTS_INTERFACE_LINE_DETAILS

HZ_DQM_SH_SYNC_INTERFACE

HZ_DQM_SYNC_INTERFACE

RA_INTERFACE_REQID_GT


Fixed Assets Interface Tables:-

------------------------------------

FA_BUDGET_INTERFACE

FA_INV_INTERFACE

FA_PRODUCTION_INTERFACE

FA_TAX_INTERFACE

FA_TRANSACTION_INTERFACE


Cash Management Interface Tables:-

-------------------------------------------

CE_ARCH_INTERFACE_HEADERS

CE_ARCH_INTERFACE_HEADERS_ALL

CE_ARCH_INTERFACE_LINES

CE_HEADER_INTERFACE_ERRORS

CE_LINE_INTERFACE_ERRORS

CE_STATEMENT_LINES_INTERFACE

CE_UK_VALIDATIONS_INTERFACE


Thursday, November 6, 2014

Manual Cost Adjustment to an Asset OR Credit Memo Adjustment to an asset from Mass Addition process


A cost adjustment can be entered manually or posted from the Mass Additions interface table.  Cost adjustments from Mass Additions are typically coming from Accounts Payable or Project Accounting and are beyond the scope of this How To.

To post a manual cost adjustment, navigate as follows:

   Responsibility:  Fixed Assets Manager

   Asset / Asset Workbench

   Query the asset 

   From the Summary screen in the Asset Workbench, select the Books button

   Type in the book or select the book from the popup menu

   Amortize checkbox:

     - do not check this box if depreciation should recalculate from the date placed in service

     - check this box only if depreciation should not be recalculated

   Tab to the lower half of the form and enter the adjusted cost in the cost field


   Click on the Done button to save

To post a Mass addition cost adjustment (Credit Memo)

Navigate to Prepare mass addition

1. Query the Credit memo using invoice number (CM #)

2. You can see the status will be “NEW”, click on “add to asset” button

3. Select the original Asset item, which you want to reduce the Costing

  - Amortize adjustment ---->do not check this box if depreciation should recalculate from the date placed in service

  - check this box only if depreciation should not be recalculated

4. click on ‘done’ button, after finishing this the status will be “HOLD”

5. Re-query the assets and change the status queue as ‘POST’ then click ok,

6. After select post queue, the status queue will be show as “COST ADJUSTMENT”

7. Click ‘done’ button

8. Run the post mass addition

9. You can find the concurrent output for the adjustment amount

10. Query the original asset and check the Financial information, there you can see new transaction added as ADJUSTMENT, now the credit memo will be adjusted the costing information

11. Revised depreciation will be take in place from Credit Memo date of services onwards,…

12. You can run the depreciation and check the status for new costing & depreciation information.

How to create .dbc file in oracle


Navigate to $INST_TOP/admin/install directory

Find the adgendbc.sh script

Run the command adgendbc.sh, It will generate .dbc file under $INST_TOP/appl/fnd/secure

Tuesday, November 4, 2014

How to determine if the workflow services are up and running?


The following query also returns the status of the workflow services:


SELECT   fcq.user_concurrent_queue_name container_name,
         DECODE (fcp.os_process_id,
                 NULL, 'Not
Running',
                 fcp.os_process_id
                ) procid,
         fcq.max_processes target, fcq.running_processes actual,
         fcq.enabled_flag enabled, fsc.component_name, fsc.component_type,
         fsc.startup_mode, fsc.component_status, SYSDATE dates
    FROM apps.fnd_concurrent_queues_vl fcq,
         apps.fnd_cp_services fcs,
         apps.fnd_concurrent_processes fcp,
         fnd_svc_components fsc
   WHERE fcq.manager_type = fcs.service_id
     AND fcs.service_handle = 'FNDCPGSC'
     AND fsc.concurrent_queue_id = fcq.concurrent_queue_id(+)
     AND fcq.concurrent_queue_id = fcp.concurrent_queue_id(+)
     AND fcq.application_id = fcp.queue_application_id(+)
     AND fcp.process_status_code(+) = 'A'
ORDER BY fcp.os_process_id, fsc.startup_mode;

Monday, November 3, 2014

INVALID_PAYEE (Invalid payee identifier) Running Automatic Remittances Creation Program


Solution:

Assign an operating unit to the payee using the following navigation:


Funds Capture Setup Administrator > Funds Capture Setup > Payees > Assign Operating Units


NOTE: It is currently possible to choose inactive operating units from the list of values (ER 10626881 has been raised requesting this functionality to be changed).  If an inactive operating unit has been chosen, this will result in the INVALID_PAYEE error.  To verify if an operating unit is inactive, use the following SQL:


select ORGANIZATION_ID, DATE_FROM, DATE_TO
from hr_operating_units;


An operating unit is inactive if the "DATE_TO" field is populated.

Receipt Reconciliation Fails With APP-AR-999967188 The Receipt is in the Process Of Funds Capture Settlement

image


1. One possible cause for this error is an incomplete transaction on the Funds Capture side.

To verify if the transaction has been completed in Funds Capture, please run the following query (using the receipt number of the failing receipt as parameter):

SELECT status
  FROM iby_trxn_summaries_all
WHERE transactionid IN (
          SELECT transactionid
            FROM iby_fndcpt_tx_operations
           WHERE trxn_extension_id IN (
                                      SELECT payment_trxn_extension_id
                                        FROM ar_cash_receipts_all
                                       WHERE receipt_number =
                                                             '&receipt_number'))
   AND trxntypeid = 100;

If the above query returns a value of 100, please execute the Create Settlement Batches request, as explained in  Note  550146.1 How To Generate Remittance Format Report In Release 12.

2. If the value returned by the query is 0, this means that the transaction is completed on the Funds Capture side and the issue might be caused by a code bug.
get_settlement_status cursor in package ARP_REVERSE_RECEIPT did not include check for reqtype 'ORAPMTEFTCLOSEBATCH' . As result AR is unable to validate that transaction was settled in  Payments.

Version of ARREREVB.pls contains

Cursor get_settlement_status IS
SELECT summ.status
FROM iby_fndcpt_tx_operations op,iby_trxn_summaries_all summ
WHERE op.trxn_extension_id = p_extension_id
AND op.transactionid = summ.transactionid
AND summ.reqtype in ('ORAPMTCAPTURE', 'ORAPMTRETURN',
'ORAPMTCREDIT', 'ORAPMTVOID', 'ORAPMTBATCHREQ')
ORDER BY summ.trxnmid desc;


as we can see 'ORAPMTEFTCLOSEBATCH' is not included.

3. In case the value retrieved by the above query is different than 100 and 0, please log a service request against Oracle Payments/Funds Capture product for further analysis.

Solution:

To resolve the issue, apply Patch 10389524:R12.AR.B

Thursday, October 16, 2014

Unable to change the Stockable attributes in inventory Item error: on-hand quantity exists or there are open deliver transaction

Error:
on-hand quantity exists or there are open deliver transaction for this item, please process before changing the attributes


Solution:

If your are in the position to change the “Inventory item” to “service Item” we have to the uncheck the following check box to change as “Service Item”

                            Inventory item
                            Stockable
                           Transactable


Since, we can’t able to uncheck it easily, we need to ensure on-hand quantity NULL & if any interorg shipment linked with it.

1) For on hand, please do misc issue.
2) For mtl_supply, please go to supply/demand screen..find out all the POs or Reqs or Interorg shipments linked, then receive and deliver them.

Make sure:-

SELECT COUNT(1) FROM MTL_ONHAND_QUANTITIES_DETAIL WHERE INVENTORY_ITEM_ID = &item_id
AND ORGANIZATION_ID = &organization_id;
==> count = 0

SELECT COUNT(1) FROM MTL_SUPPLY WHERE ITEM_ID = &item_id
AND TO_ORGANIZATION_ID = &organization_id;
==> count = 0

Then the item attribute Stockable should be able to unchecked.

Sunday, September 28, 2014

How to find employee salary details from oracle payroll tables

SELECT papf.employee_number
,papf.full_name
,pj.NAME job
,haou.NAME ORGANIZATION
,ppp.proposed_salary_n salary
FROM per_all_people_f papf
,per_all_assignments_f paaf
,per_jobs pj
,hr_all_organization_units haou
,per_position_definitions ppd
,per_all_positions pap
,per_pay_proposals ppp
WHERE 1 = 1
AND SYSDATE BETWEEN papf.effective_start_date AND papf.effective_end_date
AND papf.current_employee_flag = 'Y'
AND papf.employee_number IS NOT NULL
AND paaf.person_id = papf.person_id
AND SYSDATE BETWEEN paaf.effective_start_date AND paaf.effective_end_date
AND paaf.job_id = pj.job_id
AND paaf.organization_id = haou.organization_id
AND paaf.position_id = pap.position_id
AND pap.position_definition_id = ppd.position_definition_id
AND ppp.pay_proposal_id = (SELECT MAX (pay_proposal_id)
FROM per_pay_proposals
WHERE assignment_id = paaf.assignment_id)

Thursday, September 25, 2014

Java HotSpot(TM) Server VM warning: You have loaded library /u01/install/APPS/apps/tech_st/10.1.2/lib/librwu.so which might have disabled stack guard. The VM will try to fix the stack guard now. It's highly recommended that you fix the library with 'execstack -c ', or link it with '-z noexecstack'.

Error:

Upgraded several EBS 12.1.3 environments to Java 7 following note 1467892.1.

The upgrade seems to have went well - but in every case concurrent programs which use Oracle Reports log the following in the request logs on every run:

Java HotSpot(TM) Server VM warning: You have loaded library /u01/app/appltst1/apps/tech_st/10.1.2/lib/librwu.so which might have disabled stack guard. The VM will try to fix the stack guard now.
It's highly recommended that you fix the library with 'execstack -c ', or link it with '-z noexecstack'.

Otherwise all requests appear to complete normally.

SOLUTION

Please apply Reports Patch: 17645157 to the 10.1.2.3 Oracle Home and confirm that this resolves the issue.


NOTE: As documented in bug: 17762579, the rollback of patch 16207165 is expected. Patch 17645157 has only been ported for LINUX.

How to apply this Patch:

==============================
Interim Patch for Bug: 17645157
==============================

Date                 : Aug 25 2014
---------------------------------
Platform Patch for   : Linux
Product Patched      : Oracle reports
Product Version      : 10.1.2.3.0
Auto Enabled         : No

This document describes how to install the interim patch for
bug # 17645157. It includes the following sections:

       Section 1, "Prerequisites"

       Section 2, "Pre-Installation Instructions"

       Section 3, "Installation Instructions"

       Section 4, "Post-Installation Instructions"

       Section 5, "Deinstallation Instructions"

       Section 6, "Post Deinstallation Instructions"

       Section 7, "Bugs Fixed by This Patch"

1 Prerequisites
----------------

1. For non-recommended patches, you must have the exact symptoms
   described in the service request (SR).

2. Confirm the version of Perl installed and configured for the ORACLE_HOME.

Oracle requires that all customers have at least Perl 5.00503 installed
and configured for patching activities inside the ORACLE_HOME.  Follow
these steps to check the Perl version for the ORACLE_HOME being patched:

  - source the ORACLE_HOME environment
  - execute "perl -v"
  - verify that the returned version of Perl is 5.00503 or higher

If the Perl configured for the ORACLE_HOME is not at 5.00503 or
higher, follow the directions in this My Oracle Support note to update to
a more recent version:

Note 189489.1 - Oracle Data Server Interim Patch Installation
https://support.oracle.com/CSP/main/article?cmd=show&type=NOT&id=189489.1

3.  Verify the OUI Inventory.

OPatch needs access to a valid OUI inventory to apply patches.
Validate the OUI inventory with the following command:

  opatch lsinventory

If the command errors out, contact Oracle Support and work to validate
and verify the inventory setup before proceeding.

4.  Review and download the latest version of OPatch.

Oracle recommends that all customers be on the latest version of OPatch.
Please review the following My Oracle Support note and follow the instructions
to update to the latest version if needed:

Note 224346.1 - Opatch - Where Can I Find the Latest Version of Opatch? 
https://support.oracle.com/CSP/main/article?cmd=show&type=NOT&id=224346.1

5.  Confirm executables appear in your system PATH.

The patching process will use the unzip and the opatch executables.  After
sourcing the ORACLE_HOME environment, confirm both of these exist before
continuing:

  - "which opatch"
  - "which unzip"

If either of these executables do not show in the PATH, correct the problem
before proceeding.

2 Pre-Installation Instructions
-------------------------------

N/A


3 Installation Instructions
---------------------------

1. Unzip the patch zip file into the PATCH_TOP.

   $ unzip -d PATCH_TOP p17645157_101230_Linux.zip

    NOTE: In WINDOWS, the unzip command might not work as this zip has
    certain contents which passes the 256 characters limit.
    To overcome this problem, please use alternate ZIP utility like
    7-Zip to unzip the patch.

    For example: To unzip using 7-zip, run the command:
         "c:\Program Files\7-Zip\7z.exe"  x p17645157_101230_Linux.zip

2. Set your current directory to the directory where the patch is located.

   $ cd PATCH_TOP/17645157

3. Run OPatch to apply the patch.

       $ opatch apply

When OPatch starts, it validates the patch and makes sure that there are no
conflicts with the software already installed in the ORACLE_HOME.
  OPatch categorizes two types of conflicts:

     a. Conflicts with a patch already applied to the ORACLE_HOME
        In this case, stop the patch installation, and contact Oracle Support
        Services.

     b. Conflicts with subset patch already applied to the ORACLE_HOME
        In this case, continue the install, as the new patch contains all the
        fixes from the existing patch in the ORACLE_HOME.

Important Instruction:
----------------------

   Relink the reports
   cd $ORACLE_HOME/reports/lib
   make -f ins_reports.mk install


4 Post-Installation Instructions
---------------------------------

   N/A

5 Deinstallation Instructions
------------------------------

If you experience any problems after installing this patch, remove the patch as
follows:

1. Make sure to follow the same Prerequisites or pre-install steps (if any)
   when deinstalling a patch.
   This includes setting up any environment variables like ORACLE_HOME and
   verifying the OUI inventory before deinstalling.

2. Change to the directory where the patch was unzipped.

   $ cd PATCH_TOP/17645157

3. Run OPatch to deinstall the patch.
   
   $ opatch rollback -id 17645157

6 Post Deinstallation Instructions
-----------------------------------

N/A

7 Bugs Fixed by This Patch
--------------------------
The following are the bugs fixed by this patch:

17645157 - APPS6:GETTING JAVA SERVER VM WARNING WITH 10.1.2 ORACLE_HOME EXE , JDK 1.7.0_40
                                                                                                                                                                                                              

-----------------------------------------------------------------------------
DISCLAIMER:

This interim patch has only undergone basic unit testing, and has not been
through a complete test cycle generally followed for a production patch set.
Though the fixes in this document rectifies the bug, Oracle Corporation will
not be responsible for other issues that may arise due to these fixes.
Oracle Corporation recommends to later upgrade to the next production patch
set, when available. Applying this patch could overwrite other interim
patches applied since the last patch set. Customers need to make a request
to Oracle Support for a patch that includes those fixes, as well as inform
Oracle Support about all the patches installed when a Service Request is
opened. Please download, test, and provide feedback as soon as possible
to assist in the timely resolution of this problem.

Copyright (c) 2014, Oracle and/or its affiliates. All rights reserved.
-----------------------------------------------------------------------------


Wednesday, September 24, 2014

Not able to populate retained earning account in ledger setup in 12.2.3 - "Please choose an existing combination"

Issue:

Not able to populate retained earning account in ledger setup.
First time Create button is set, it displays the error message: Please choose an existing combination
Then pressing the Create button does nothing.

STEPS
-----------------------
The issue can be reproduced at will with the following steps:
1. Setup-->ASM-->Ledger


Solution:

To implement the solution, please execute the following steps:

1. Download and review the readme and pre-requisites for Patch:18123067>:R12.FND.C

2. Ensure that you have taken a backup of your system before applying the recommended patch.

3. Apply the patch in a test environment.

4. Confirm the following file versions:
KeyFlexfield.java 120.12.12020000.3
You can use the commands like the following:
strings -a $JAVA_TOP/oracle/apps/fnd/flexj/KeyFlexfield.class | grep '$Header'

5. Bounce the instance after applying the patch

6. Re-test the issue.

7. Migrate the solution as appropriate to other environments.

Wednesday, August 27, 2014

How to setup the Virtualbox shared folder


Steps for accessing the shared folder from oracle virtualbox guest operating system

Select the “Settings” from virtualbox manager

image

click on shared folders and add shared folder path with appropriate access 

image

You can see the shared folder availability

image

click start –> Run

Then type the \\vboxsvr\<Shared folder name>

click ok

image

Now you can able to access you files from selected location

image

Thursday, August 21, 2014

Important E-Business–Oracle Support Notes


Period Close Advisor: E-Business Suite (EBS) (Doc ID 335.1)
How to Access Oracle E-Business Suite Transfer of Information (TOI) Online Training (Doc ID 403349.1)
E-BS Financials Problem Monitor - Latest Updates (Doc ID 1625357.2)

Thursday, August 14, 2014

Reporting Currency transaction in oracle Assets Financial information screen–12.1.3

Issue:

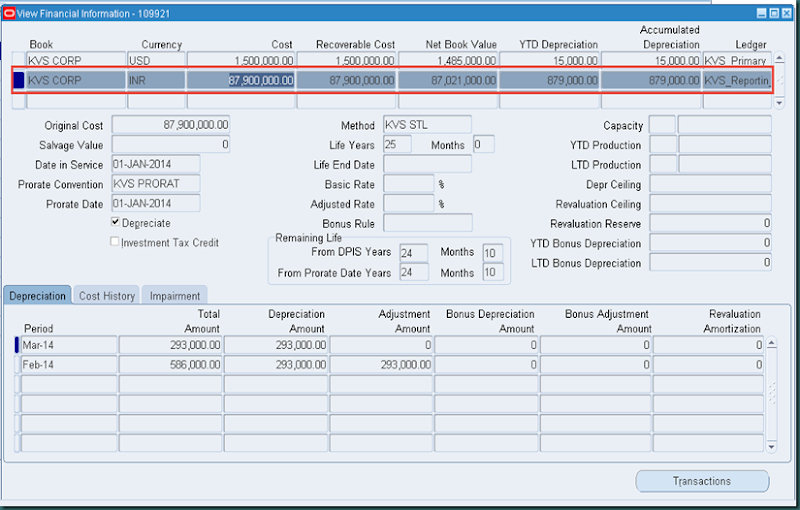
I am using one primary ledger functional currency as USD and also using Reporting currency INR in “Sub-Ledger Level” balancing.

I added on assets using Assets details Addition but I can’t able to see the reporting currency information in assets view financial information screen.

In the below screen

image


Solution:

This issue is due to lower form version.

Apply patch 16363198:R12.FA.B.

Version should be like below,

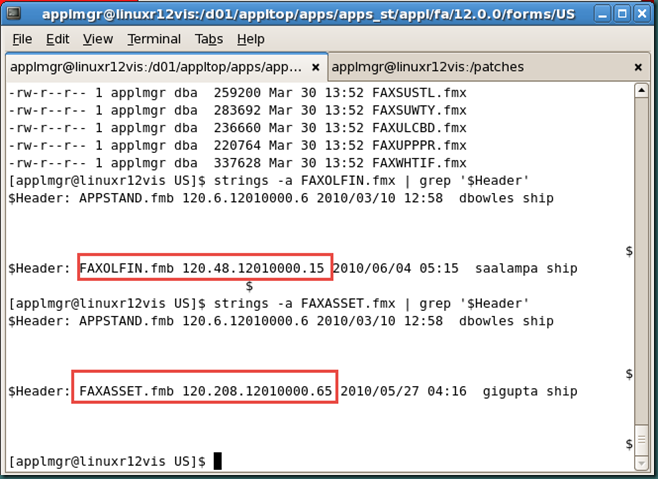
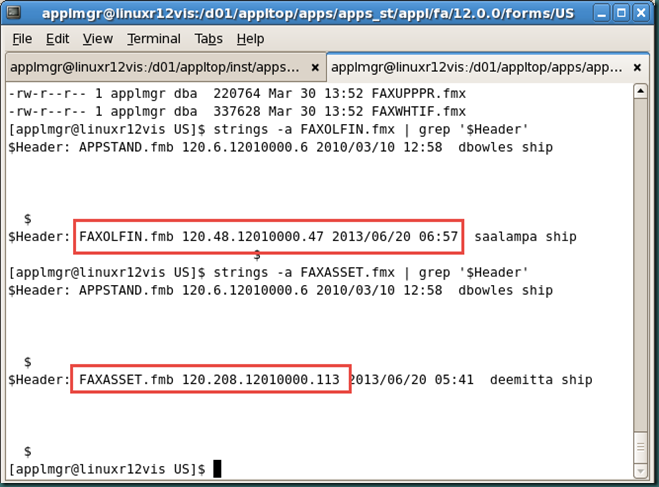
Successful patch installation checks: Check the file version , they have to be the same as given below. forms/US/FAXASSET.fmb - 120.208.12010000.113

forms/US/FAXOLFIN.fmb - 120.48.12010000.47

But its lower then recommended

image


Once patch applied successfully, check the above file versions

image

Now the reporting currency balances are listing in the view financial information screen.

image

How to - Create, Update, Upload, Rollback and Delete Oracle Asset Impairment Transactions in R12

I) Create Impairment Record:
---------------------------

1. Navigate to Assets responsibility:
(N) Assets> Impairment > Create and Post

2. Click the "New Impairment" button to launch WebAdi for entering impairments.

3. Enter Impairment header information:
Book: Choose book from the list of values (double click the field to invoke LOV)
Impairment Name: Enter impairment name for reference
Impairment Date: Enter a date in the current open period
User Entered date: For reference only

4. Enter Impairment detail information:
Status: Set the status to "Preview" from the LOV for the
"Preview impairments" program to process the row, if it is
left at "New" then the impairment preview will not be processed.
Asset Number: If the impairment information is only for a specific asset
number then select the asset. This can be done by entering
the asset number value or double click the field to invoke LOV.
Cash-Generating Unit (CGU): If the Impairment is made at the
Cash-Generating Unit level then this will have to be selected.
This can be done by entering it directly or double click the
field to invoke LOV.

*Restriction: Use CGU or Asset Number but never both.
Net Selling Price/Value in Use: Enter net selling price and/or Value in Use
Impairment Loss: Enter the amount of impairment loss only if the
Net Selling Price and the Value in Use are null.
Goodwill Amount: Optionally enter goodwill amount and goodwill
asset number for goodwill treatment.

5. Use the top menu to click Oracle > Upload to view upload parameters,
click the "Upload" button to submit the concurrent program.


II) Update Impairments:
-----------------------

1. Navigate to Assets responsibility:
(N) Assets> Impairment > Create and Post

2. Query for existing Impairments by: Book, Cash-Generating Unit,
Impairment Name, Asset Number, Impairment Date, Status.

3. For each Impairment line, the "Update Impairment" button can be pressed to
open WebAdi spreadsheet for updating impairments.

4. Perform necessary changes for the Impairment line.

5. Use the top menu to click Oracle > Upload to view upload parameters,
click the "Upload" button to submit the concurrent program.


III) Upload the Impairments:
-----------------------------

1. Navigate to Assets responsibility:
(N) Assets> Impairment > Create and Post

2. Query for existing Impairments by: Book, Cash-Generating Unit,
Impairment Name, Asset Number, Impairment Date, Status.
The search needs to be made for impairments with the status "Previewed".

3. Use "Select" check box to pick the impairments that needs to be posted.

4. Press "Post" button.


IV) Rollback Impairments:
-------------------------

1. Navigate to Assets responsibility:
(N) Assets> Impairment > Create and Post

2. Query for existing Impairments by: Book, Cash-Generating Unit,
Impairment Name, Asset Number, Impairment Date, Status.
The search needs to be made for impairments with the status "Posted".

3. Use "Select" check box to pick the impairments that need to be rolled back.

4. Press "Rollback" button.


V) Delete Impairments:
----------------------

1. Navigate to Assets responsibility:
(N) Assets> Impairment > Create and Post

2. Query for existing Impairments by: Book, Cash-Generating Unit,
Impairment Name, Asset Number, Impairment Date, Status.
The search needs to be made for impairments with status different
than "Posted".

3. Use "Select" check box to pick the impairments that need to be deleted.

4. Press "Delete" button.

How to Setup Asset Impairments in Oracle R12


I. Setup Cash Generating Unit (CGU):

1. Navigate to Assets responsibility:
(N) Setup > Asset System > Cash Generating Units
2. Define or maintain Cash Generating Units for each book that needs
Impairment functionality.

II. Assign Cash Generating Units to Assets:

There are two possibilities to assign Cash Generating Units:

A) Manually via Asset Workbench:

1. Navigate to Assets responsibility:
(N) Assets > Asset Workbench
2. Query for the existing assets that needs to be assigned to
Cash Generating Units.
3. Press "Books" and select from LOV the book name.
4. Go to Impairment tab and use the LOV from the Cash Generating Unit
field to assign or change CGU assignment.

B) By mass assignment via WEB ADI:

1. Navigate to Assets responsibility:
(N) Assets > Impairment > Assign Cash Generating Units
2. Enter Book , Asset Number and CGU
3. From the main toolbar go Oracle > Upload for uploading the assignment
information to the assets.

III. Setup Impairment Accounts:

Setup Impairment Expense account and Accumulated Impairment
account in the Asset Categories form.

1. Navigate to Assets responsibility:
(N) Setup > Asset System > Asset Categories
2. Query for Asset Categories and Books.
3. Enter the accounting information for Impairment Expense account
and Accumulated Impairment.

Tuesday, August 12, 2014

Error–Function Not available in this responsibility Change the responsibility or contact system administrator

Error when Diagnostics—> Examine

image

image

This is due to Profile option.

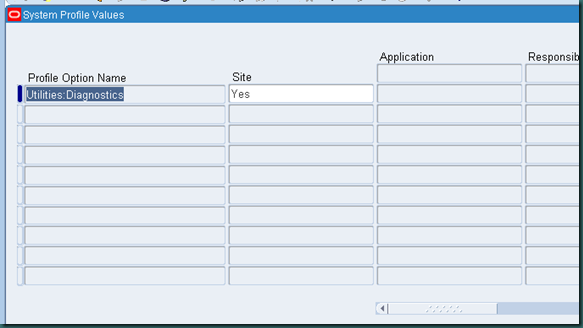
Navigate to the system administrator > Profile > System, and query the profile option name as “Utilities:Diagnostics” and set to “ YES” on site, application etc.. to how ever you want to give the access.

Select “Yes” and save.

image

image

image

Now we can able to check the record.

Subledger Account Analysis Report using parameter 'Journal Entry Source' in Release 12

1. Parameter 'Journal Entry Source' (parameter code p_application_id) in Subledger
Account Analysis Report by default is display disabled.
2. Enable the display of this parameter from System Administrator Responsibility and submit the
report from a Subledger or General Ledger responsibility.
3. If no source is provided or the parameter is not enabled the report by default would run for
all sources for the given account range as per the standard behavior of Account Analysis Report.

If the parameter is not available:
1.Download and review the readme and pre-requisites for Patch.9668652:R12.XLA.B
2.Ensure that you have taken a backup of your system before applying the recommended patch.
3.Apply the patch in a test environment.
4.Confirm the following file versions:
xlapatch/115/import/USxla120cp.ldt120.131.12010000.40
xlapatch/115/publisher/defsXLAAARPT.xml120.29.12010000.13
xlapatch/115/publisher/templates/USXLAAAR01.rtf120.12.12010000.10
xlapatch/115/sqlxlarpaan.pkb120.25.12010000.10
xlapatch/115/sqlxlarpaan.pkh120.12.12010000.6
You can use the commands like the following: strings -a $XX_TOP/filename |grep '$Header'
5.Retest the issue.
6.Migrate the solution as appropriate to other environment

Monday, August 11, 2014

How To Transfer Reconciliation References From FA Subledger To GL

Navigation: Setup > Financials > Subledger Accounting > Accounting Methods Builder > Journal Entry Setups > Journal Line Types

1. Query a seeded Journal Line Type and copy it by clicking on the Copy button at the bottom left of the form

2. Give your Journal Line Type code, name, and description a meaningful name.

3. Click on the Accounting Attribute Assignments button at the bottom right of the form

4. Pick a source for the Reconciliation Reference

5. Save.

Navigation: Setup > Financials > Subledger Accounting > Accounting Methods Builder > Methods and Definitions > Journal Line Definitions

6. Link the Journal Line Type just created to the Journal Line Definition. Copy a seeded one and create your own if needed.

7. Assuming that the JLD is already linked to the Application Accounting Definition, validate the Application Accounting Definition either in the form or via the concurrent program 'Validate Application Accounting Definitions'.
Assuming also that the Application Accounting Definition is already linked to the Subledger Accounting Method which in turn is already linked with the ledger, Create Accounting can now be run.

8. Once Create Accounting, Journal Import and the Post program in GL have completed, one can reconcile either manually or run Automatic reconciliation in GL.

Setup Steps to Enable GL Reconciliation from Subledgers in Oracle R12

1] Customize the complete Subledger Accounting (SLA), reconciliation reference is enabled as a part of Journal Line Type.

2] For the Custom SLA ensure that the Journal Line Type for the corresponding line for the corresponding subledger is set to 'Detail'. Navigation: Setup : Accounting Setups : Subledger Accounting Setup : Accounting Methods Builder : Journal Entry Setups

3] Enable 'Reconciliation Reference' for this particular line by selecting something in the 'Source' field LOV, click on 'Accounting Attribute Assignments' in the Journal Line Type form. Note that such changes can not be made in Standard (Seeded) SLA setups, hence a completely customized SLA is required to enable reconciliation references

4] Ensure that the customized SLA is attached to the concerned Ledger as well. this can be done using Accounting Setup Manager (ASM). Navigation: Setup : Financials : Accounting Setup Manager

5] Ensure that reconciliation is enabled for the ledger as well, this can be done using Accounting Setup Manager (ASM). Navigation: Setup : Financials : Accounting Setup Manager

6] Ensure that the code combination which is used in Subledger and transferred to General Ledger as a part of Create Accounting process is enabled for Reconciliation. This can be done at Setup > Accounts > Combinations form, there is a new field in this form in R12 called as 'Reconcile'. This should be enabled for the required code combination. If this is enabled then only journal import imports the reconciliation references.

To to automatically propagate the Reconciliation Flag of a segment value to all account code combinations which contain that segment value Program - Inherit Segment Value Attributes needs to be run.

Thursday, August 7, 2014

Description for Journal Entry Line not Populated in GL_JE_LINES.REFERENCE10 in Oracle R12

Issue:

When Journal Import runs in summary mode, the description will always be 'Journal Import Created'. When Journal Import runs in detail mode, the description will only be 'Journal Import Created' if reference10 is null, and the subledger_doc_sequence_value is null on GL_INTERFACE.

Solution

Run Journal Import in detail mode. 
1. Use General Ledger Super User
2. The Navigation Path is:Journal>Import>Run 
3. Make sure Create Summary Journals checkbox is blank.

Wednesday, August 6, 2014

How to check Prepayment Fully applied status using Invoice_id input in Oracle Payables

SELECT pv.VENDOR_NAME,
ai.invoice_num,
NVL (
DECODE (
SIGN (SUM (amount - NVL (prepay_amount_remaining, amount))),
1,
DECODE (SUM (prepay_amount_remaining), 0, 'Y', NULL),
NULL
),
'N'
)
AS PP_F -- Y is Fully Applied, N is Partially or Not Applied
FROM ap_invoice_distributions_all aid, ap_invoices_all ai, po_vendors pv
WHERE aid.invoice_id = ai.INVOICE_ID
AND pv.VENDOR_ID = ai.VENDOR_ID
AND aid.line_type_lookup_code = 'ITEM'
AND ai.invoice_type_lookup_code = 'PREPAYMENT'
AND ai.INVOICE_ID = :P_INVOICE_ID
AND NVL (reversal_flag, 'N') <> 'Y'
GROUP BY pv.vendor_name, ai.invoice_num
HAVING NVL (
DECODE (
SIGN (SUM (amount - NVL (prepay_amount_remaining, amount))),
1,
DECODE (SUM (prepay_amount_remaining), 0, 'Y', NULL),
NULL
),
'N'
) <> 'Y';

Monday, August 4, 2014

How to check online FND_USERS in Oracle EBS R12

SELECT DISTINCT icx.session_id, icx.user_id, fu.user_name, fu.description
FROM icx_sessions icx, fnd_user fu
WHERE disabled_flag != 'Y'
AND icx.pseudo_flag = 'N'
AND ( last_connect
+ DECODE (fnd_profile.VALUE ('ICX_SESSION_TIMEOUT'),
NULL, limit_time,
0, limit_time,
fnd_profile.VALUE ('ICX_SESSION_TIMEOUT') / 60
)
/ 24
) > SYSDATE
AND icx.counter < limit_connects
AND icx.user_id = fu.user_id

Wednesday, July 23, 2014

Oracle Report Manager Profile Options

Please note that the Report Manager (FRM) touches a lot of modules:

  • General Ledger (GL)
  • Financial Statement Generator (FSG)
  • Web ADI (BNE)
  • BI Publisher (XDO)
  • Report Generator (RG)


Profile Option Name Values Description
FRM: Debug Mode Yes / No activates / de-activates Debug Mode
FRM: File Listener   This profile option is seeded into the environment but are no longer used by the Report Manager product. 
Please be aware that setting these profile options will have no effect.
FRM: Generate HTML Report Yes / No see Note:827288.1
FRM: Home/Exit Navigation   This profile option is seeded into the environment but are no longer used by the Report Manager product. 
Please be aware that setting these profile options will have no effect.
FRM: Report Link   This profile option is seeded into the environment but are no longer used by the Report Manager product. 
Please be aware that setting these profile options will have no effect.
FRM: Set Auto Archive null / number of month This profile option sets a default value for the Set
Auto Archive option on the Publishing Parameters
page. Enter a positive integer to specify the
number of months from the date of publishing that
the report will be marked for archive in the
Reports Repository.
For example: To automatically mark reports for
archive after one month, enter "1".
Users can override the default value at submission
time on the Publishing Parameters page. Note that
reports are not actually archived until the Maintain
Repository concurrent request is run. For more
information, see Archiving Reports, page 6-5.
FRM: User To Value Owner Access Yes / No The profile option is only set at the user level.
When set to "Yes" it enables a user to add
participating value sets and assign owner access.
For more information, see User to Value Security,
page 7-1.
Additionally, setting this profile option to "Yes" for
a user gives that user owner privileges for all
folders and reports in the repository, overriding
any repository security restrictions defined for
individual folders or reports. See Defining
Repository Security, page 6-3.
FRM:Report Data Path

a valid temporary directory: e.g. /var/tmp

see also Patch:7296641
     
ADI: Allow Sysadmin to View all Output no / yes Set this to "Yes" to allow users with the System
Administrator responsibility to view the output for
all users. This option overrides user to value
security for System Administrators
ADI: Use Function Security yes / no  
     
     
BNE Allow No Security Rule  


BNE Allow Set Parameters    
BNE Disable    
BNE Document Lifetime    
BNE Enable Digital Signature    
BNE Enforce Parameter Values    
BNE Excel Worksheet Maximum    
BNE FND Jar Path    
BNE JAR Path    
BNE Offline List of Values Limit    
BNE Redirect Home Enabled    
BNE Redirect Portal URL    
BNE Server Log Filename e.g.  bne.log  
BNE Server Log Level REQUIRED | CRITICAL ERROR | ERROR | WARNING | INFORMATION | DETAIL | TRACE  
BNE Server Log Path e.g. /tmp  
BNE Servlet Link    
BNE Servlet Path    
BNE UIX Base Path    
BNE UIX Headless Mode Enabled    
BNE UIX Physical Directory    
BNE Upload Batch Size    
BNE Upload Import Directory    
BNE Upload Retry Count    
BNE Upload Sleep Seconds    
BNE Upload Staging Directory a valid temporary directory: e.g. /var/tmp if not set, Template upload will not work
BNE Upload Text Directory    
BNE XML Response Compression    
     
     
FSG: Accounting Flexfield    
FSG: Allow Portrait Print Style    
FSG: Database Codeset e.g.  If you are using English, then use 'US' If this profile 'FSG: Database Codeset' is missing, you can create it manually or by applying Patch 8668357:R12.FRM.B

see 
Note:858505.1
FSG: Enable Search Optimization yes / no In rel 11i valid settings are NO or YES
In Rel 12i the profile option 'FSG: Enable Search Optimization' MUST be YES 

Setting this profile option to NO in Rel 12i, could cause unpredictable and invalid results.
for example: zeros being returned for all actual balances - though data exists in GL_BALANCES
SG: Enforce Segment Value Security    
FSG: Expand Parent Value    
FSG: Message Detail    
FSG: String Comparison Mode    
FSG:Enable Attribute Reporting    
     
     
GL : Default Desktop Viewer Excel 97, Excel 2000, Excel 2002, Excel 2003, Excel 2007 Set up according to the version of Excel being used.
GL: Data Access Set   To view and interact with ledger data, the appropriate Data Access Set must be assigned to the General Ledger responsibility.
GL: Debug Mode   Allow features in General Ledger to run in Debug Mode where additional messages are detailed in the log file. Debug Mode operates for many General Ledger features, such as Journal Import, Posting, Translation, Revaluation, Consolidation, Recurring Journals, and Mass Allocation


See also
Oracle General Ledger Reference Guide
      This guide provides detailed information about setting up Oracle General Ledger profile options and Oracle Web Applications Desktop Integrator profile options.

Oracle Report Manager User's Guide Release 12.1