Wednesday, August 27, 2014

How to setup the Virtualbox shared folder


Steps for accessing the shared folder from oracle virtualbox guest operating system

Select the “Settings” from virtualbox manager

image

click on shared folders and add shared folder path with appropriate access 

image

You can see the shared folder availability

image

click start –> Run

Then type the \\vboxsvr\<Shared folder name>

click ok

image

Now you can able to access you files from selected location

image

Thursday, August 21, 2014

Important E-Business–Oracle Support Notes


Period Close Advisor: E-Business Suite (EBS) (Doc ID 335.1)
How to Access Oracle E-Business Suite Transfer of Information (TOI) Online Training (Doc ID 403349.1)
E-BS Financials Problem Monitor - Latest Updates (Doc ID 1625357.2)

Thursday, August 14, 2014

Reporting Currency transaction in oracle Assets Financial information screen–12.1.3

Issue:

I am using one primary ledger functional currency as USD and also using Reporting currency INR in “Sub-Ledger Level” balancing.

I added on assets using Assets details Addition but I can’t able to see the reporting currency information in assets view financial information screen.

In the below screen

image


Solution:

This issue is due to lower form version.

Apply patch 16363198:R12.FA.B.

Version should be like below,

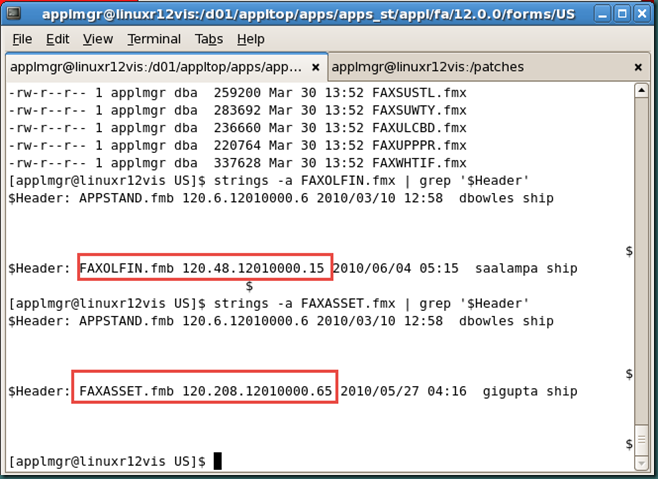
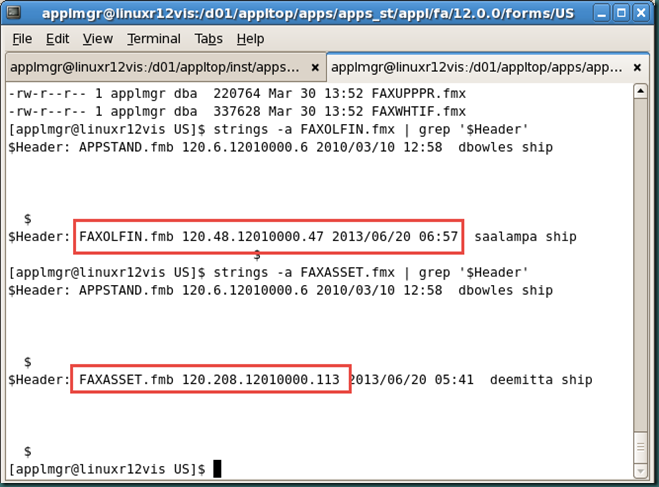
Successful patch installation checks: Check the file version , they have to be the same as given below. forms/US/FAXASSET.fmb - 120.208.12010000.113

forms/US/FAXOLFIN.fmb - 120.48.12010000.47

But its lower then recommended

image


Once patch applied successfully, check the above file versions

image

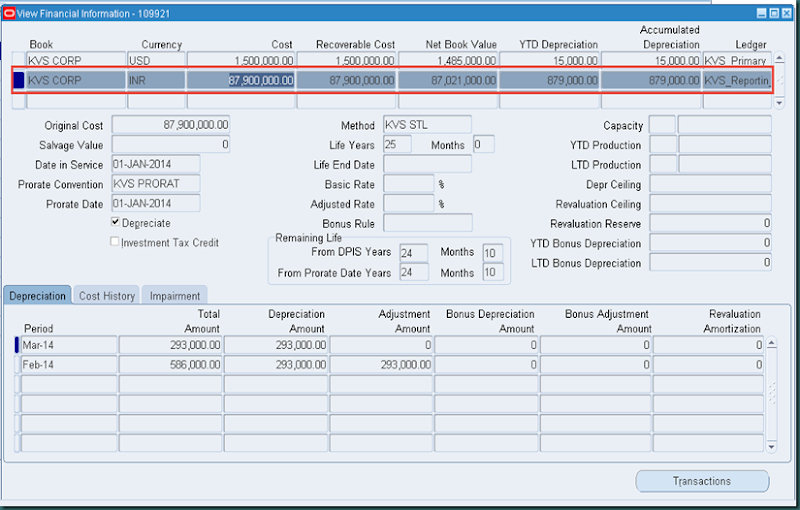
Now the reporting currency balances are listing in the view financial information screen.

image

How to - Create, Update, Upload, Rollback and Delete Oracle Asset Impairment Transactions in R12

I) Create Impairment Record:
---------------------------

1. Navigate to Assets responsibility:
(N) Assets> Impairment > Create and Post

2. Click the "New Impairment" button to launch WebAdi for entering impairments.

3. Enter Impairment header information:
Book: Choose book from the list of values (double click the field to invoke LOV)
Impairment Name: Enter impairment name for reference
Impairment Date: Enter a date in the current open period
User Entered date: For reference only

4. Enter Impairment detail information:
Status: Set the status to "Preview" from the LOV for the
"Preview impairments" program to process the row, if it is
left at "New" then the impairment preview will not be processed.
Asset Number: If the impairment information is only for a specific asset
number then select the asset. This can be done by entering
the asset number value or double click the field to invoke LOV.
Cash-Generating Unit (CGU): If the Impairment is made at the
Cash-Generating Unit level then this will have to be selected.
This can be done by entering it directly or double click the
field to invoke LOV.

*Restriction: Use CGU or Asset Number but never both.
Net Selling Price/Value in Use: Enter net selling price and/or Value in Use
Impairment Loss: Enter the amount of impairment loss only if the
Net Selling Price and the Value in Use are null.
Goodwill Amount: Optionally enter goodwill amount and goodwill
asset number for goodwill treatment.

5. Use the top menu to click Oracle > Upload to view upload parameters,
click the "Upload" button to submit the concurrent program.


II) Update Impairments:
-----------------------

1. Navigate to Assets responsibility:
(N) Assets> Impairment > Create and Post

2. Query for existing Impairments by: Book, Cash-Generating Unit,
Impairment Name, Asset Number, Impairment Date, Status.

3. For each Impairment line, the "Update Impairment" button can be pressed to
open WebAdi spreadsheet for updating impairments.

4. Perform necessary changes for the Impairment line.

5. Use the top menu to click Oracle > Upload to view upload parameters,
click the "Upload" button to submit the concurrent program.


III) Upload the Impairments:
-----------------------------

1. Navigate to Assets responsibility:
(N) Assets> Impairment > Create and Post

2. Query for existing Impairments by: Book, Cash-Generating Unit,
Impairment Name, Asset Number, Impairment Date, Status.
The search needs to be made for impairments with the status "Previewed".

3. Use "Select" check box to pick the impairments that needs to be posted.

4. Press "Post" button.


IV) Rollback Impairments:
-------------------------

1. Navigate to Assets responsibility:
(N) Assets> Impairment > Create and Post

2. Query for existing Impairments by: Book, Cash-Generating Unit,
Impairment Name, Asset Number, Impairment Date, Status.
The search needs to be made for impairments with the status "Posted".

3. Use "Select" check box to pick the impairments that need to be rolled back.

4. Press "Rollback" button.


V) Delete Impairments:
----------------------

1. Navigate to Assets responsibility:
(N) Assets> Impairment > Create and Post

2. Query for existing Impairments by: Book, Cash-Generating Unit,
Impairment Name, Asset Number, Impairment Date, Status.
The search needs to be made for impairments with status different
than "Posted".

3. Use "Select" check box to pick the impairments that need to be deleted.

4. Press "Delete" button.

How to Setup Asset Impairments in Oracle R12


I. Setup Cash Generating Unit (CGU):

1. Navigate to Assets responsibility:
(N) Setup > Asset System > Cash Generating Units
2. Define or maintain Cash Generating Units for each book that needs
Impairment functionality.

II. Assign Cash Generating Units to Assets:

There are two possibilities to assign Cash Generating Units:

A) Manually via Asset Workbench:

1. Navigate to Assets responsibility:
(N) Assets > Asset Workbench
2. Query for the existing assets that needs to be assigned to
Cash Generating Units.
3. Press "Books" and select from LOV the book name.
4. Go to Impairment tab and use the LOV from the Cash Generating Unit
field to assign or change CGU assignment.

B) By mass assignment via WEB ADI:

1. Navigate to Assets responsibility:
(N) Assets > Impairment > Assign Cash Generating Units
2. Enter Book , Asset Number and CGU
3. From the main toolbar go Oracle > Upload for uploading the assignment
information to the assets.

III. Setup Impairment Accounts:

Setup Impairment Expense account and Accumulated Impairment
account in the Asset Categories form.

1. Navigate to Assets responsibility:
(N) Setup > Asset System > Asset Categories
2. Query for Asset Categories and Books.
3. Enter the accounting information for Impairment Expense account
and Accumulated Impairment.

Tuesday, August 12, 2014

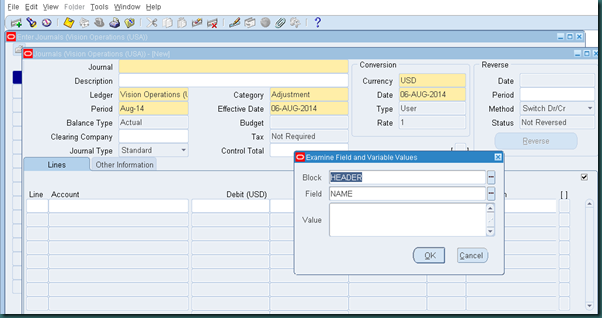
Error–Function Not available in this responsibility Change the responsibility or contact system administrator

Error when Diagnostics—> Examine

image

image

This is due to Profile option.

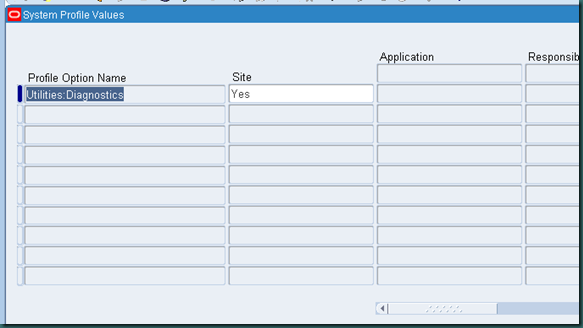
Navigate to the system administrator > Profile > System, and query the profile option name as “Utilities:Diagnostics” and set to “ YES” on site, application etc.. to how ever you want to give the access.

Select “Yes” and save.

image

image

image

Now we can able to check the record.

Subledger Account Analysis Report using parameter 'Journal Entry Source' in Release 12

1. Parameter 'Journal Entry Source' (parameter code p_application_id) in Subledger
Account Analysis Report by default is display disabled.
2. Enable the display of this parameter from System Administrator Responsibility and submit the
report from a Subledger or General Ledger responsibility.
3. If no source is provided or the parameter is not enabled the report by default would run for
all sources for the given account range as per the standard behavior of Account Analysis Report.

If the parameter is not available:
1.Download and review the readme and pre-requisites for Patch.9668652:R12.XLA.B
2.Ensure that you have taken a backup of your system before applying the recommended patch.
3.Apply the patch in a test environment.
4.Confirm the following file versions:
xlapatch/115/import/USxla120cp.ldt120.131.12010000.40
xlapatch/115/publisher/defsXLAAARPT.xml120.29.12010000.13
xlapatch/115/publisher/templates/USXLAAAR01.rtf120.12.12010000.10
xlapatch/115/sqlxlarpaan.pkb120.25.12010000.10
xlapatch/115/sqlxlarpaan.pkh120.12.12010000.6
You can use the commands like the following: strings -a $XX_TOP/filename |grep '$Header'
5.Retest the issue.
6.Migrate the solution as appropriate to other environment

Monday, August 11, 2014

How To Transfer Reconciliation References From FA Subledger To GL

Navigation: Setup > Financials > Subledger Accounting > Accounting Methods Builder > Journal Entry Setups > Journal Line Types

1. Query a seeded Journal Line Type and copy it by clicking on the Copy button at the bottom left of the form

2. Give your Journal Line Type code, name, and description a meaningful name.

3. Click on the Accounting Attribute Assignments button at the bottom right of the form

4. Pick a source for the Reconciliation Reference

5. Save.

Navigation: Setup > Financials > Subledger Accounting > Accounting Methods Builder > Methods and Definitions > Journal Line Definitions

6. Link the Journal Line Type just created to the Journal Line Definition. Copy a seeded one and create your own if needed.

7. Assuming that the JLD is already linked to the Application Accounting Definition, validate the Application Accounting Definition either in the form or via the concurrent program 'Validate Application Accounting Definitions'.
Assuming also that the Application Accounting Definition is already linked to the Subledger Accounting Method which in turn is already linked with the ledger, Create Accounting can now be run.

8. Once Create Accounting, Journal Import and the Post program in GL have completed, one can reconcile either manually or run Automatic reconciliation in GL.

Setup Steps to Enable GL Reconciliation from Subledgers in Oracle R12

1] Customize the complete Subledger Accounting (SLA), reconciliation reference is enabled as a part of Journal Line Type.

2] For the Custom SLA ensure that the Journal Line Type for the corresponding line for the corresponding subledger is set to 'Detail'. Navigation: Setup : Accounting Setups : Subledger Accounting Setup : Accounting Methods Builder : Journal Entry Setups

3] Enable 'Reconciliation Reference' for this particular line by selecting something in the 'Source' field LOV, click on 'Accounting Attribute Assignments' in the Journal Line Type form. Note that such changes can not be made in Standard (Seeded) SLA setups, hence a completely customized SLA is required to enable reconciliation references

4] Ensure that the customized SLA is attached to the concerned Ledger as well. this can be done using Accounting Setup Manager (ASM). Navigation: Setup : Financials : Accounting Setup Manager

5] Ensure that reconciliation is enabled for the ledger as well, this can be done using Accounting Setup Manager (ASM). Navigation: Setup : Financials : Accounting Setup Manager

6] Ensure that the code combination which is used in Subledger and transferred to General Ledger as a part of Create Accounting process is enabled for Reconciliation. This can be done at Setup > Accounts > Combinations form, there is a new field in this form in R12 called as 'Reconcile'. This should be enabled for the required code combination. If this is enabled then only journal import imports the reconciliation references.

To to automatically propagate the Reconciliation Flag of a segment value to all account code combinations which contain that segment value Program - Inherit Segment Value Attributes needs to be run.

Thursday, August 7, 2014

Description for Journal Entry Line not Populated in GL_JE_LINES.REFERENCE10 in Oracle R12

Issue:

When Journal Import runs in summary mode, the description will always be 'Journal Import Created'. When Journal Import runs in detail mode, the description will only be 'Journal Import Created' if reference10 is null, and the subledger_doc_sequence_value is null on GL_INTERFACE.

Solution

Run Journal Import in detail mode. 
1. Use General Ledger Super User
2. The Navigation Path is:Journal>Import>Run 
3. Make sure Create Summary Journals checkbox is blank.

Wednesday, August 6, 2014

How to check Prepayment Fully applied status using Invoice_id input in Oracle Payables

SELECT pv.VENDOR_NAME,
ai.invoice_num,
NVL (
DECODE (
SIGN (SUM (amount - NVL (prepay_amount_remaining, amount))),
1,
DECODE (SUM (prepay_amount_remaining), 0, 'Y', NULL),
NULL
),
'N'
)
AS PP_F -- Y is Fully Applied, N is Partially or Not Applied
FROM ap_invoice_distributions_all aid, ap_invoices_all ai, po_vendors pv
WHERE aid.invoice_id = ai.INVOICE_ID
AND pv.VENDOR_ID = ai.VENDOR_ID
AND aid.line_type_lookup_code = 'ITEM'
AND ai.invoice_type_lookup_code = 'PREPAYMENT'
AND ai.INVOICE_ID = :P_INVOICE_ID
AND NVL (reversal_flag, 'N') <> 'Y'
GROUP BY pv.vendor_name, ai.invoice_num
HAVING NVL (
DECODE (
SIGN (SUM (amount - NVL (prepay_amount_remaining, amount))),
1,
DECODE (SUM (prepay_amount_remaining), 0, 'Y', NULL),
NULL
),
'N'
) <> 'Y';

Monday, August 4, 2014

How to check online FND_USERS in Oracle EBS R12

SELECT DISTINCT icx.session_id, icx.user_id, fu.user_name, fu.description
FROM icx_sessions icx, fnd_user fu
WHERE disabled_flag != 'Y'
AND icx.pseudo_flag = 'N'
AND ( last_connect
+ DECODE (fnd_profile.VALUE ('ICX_SESSION_TIMEOUT'),
NULL, limit_time,
0, limit_time,
fnd_profile.VALUE ('ICX_SESSION_TIMEOUT') / 60
)
/ 24
) > SYSDATE
AND icx.counter < limit_connects
AND icx.user_id = fu.user_id